Creating a Python Telegram bot in PyCharm

In this blog post I’ll cover the initial PyCharm setup and then I’ll show you how to create a Telegram bot using Python. Finally, we will add some validation to our application because everyone knows that’s a Good Thing to do. I have recently started learning Python using PyCharm so if you have any improvements or comments, please leave me a message at the end of this blog post!

Credit: This blog post is based off this excellent post; I’ve made some modifications to it, added PyCharm specific content as well as plenty of validation as you’ll soon see.

Python

Before we start, you need to install a recent version of Python on your machine. At the time of writing, that was 3.11.2. A version of Python may have shipped with your operating system, but it might well need upgrading. 

If you’re using macOS and Homebrew you can use brew install pyenv. Alternatively, this page covers installing Homebrew and then Python. If you’re using Windows, this page is where you want to go. Ensure you know which path you installed Python into because PyCharm will need to know about it in the next step.

Telegram

Of course downloading Telegram would be a good idea if you’re following this tutorial because you’ll want to check that your code works! You will also need to get a bot code from the platform. Once it’s installed, search for the amusingly named user @BotFather and send them a /newbot message. 

Now you can follow the prompts to name your bot. I named mine horoscopefinder. You’ll also need to choose a unique username and then @BotFather will give you a magic token which you will need in this tutorial.

PyCharm

You can get PyCharm from JetBrains and use the free Community Edition for this application. Of course, if you have PyCharm Professional, you can also use that. If you’re already using any JetBrains product (and I sure hope you are), get the JetBrains Toolbox app to manage all your tools and their updates in one place. Also, check out this video from Paul if you want to know more about installing PyCharm.

The Bot Code

Open up PyCharm and click New Project to launch the wizard.

Stick with the default location path unless you have a good reason to change it, then give your project a name such as horoscope-bot.

Python interpreters are usually a per-project basis and they are isolated from your other projects. We will create a new virtual one so leave the default setting of Virtualenv and the default location. In the Base interpreter drop-down you should see the version of Python that you’ve installed, in our case, that’s 3.9. Use the file browser button to locate the version of Python that you’ve installed. Leave the other defaults and click Create.

Now we have a little main.py file which PyCharm created for us which is helpful if you’ve not used the IDE before. For this tutorial, we’re going to delete all of that and start fresh.

Delete the contents of the main.py file and type the following code:

import os 
from telebot import TeleBot 

BOT_TOKEN = os.environ.get('BOT_TOKEN') bot = TeleBot(BOT_TOKEN)

Both telebot and Telebot will be underlined with a red squiggly line. You can fix that by putting your caret in telebot and using (⌥⏎ | Alt+Enter) then selecting Install package telebot.

Remember that Telegram token you got from @BotFather? Now’s the time to use it. You can either add it directly into your Telebot method with single quote marks:

BOT_TOKEN = os.environ.get('BOT_TOKEN')
bot = TeleBot('6223382617:ADF_Ji_W60L9PCKE_r0g4FGdDKg9Amf_pKl')

Or, my preferred way is to add it as an environmental variable in the Run Configuration. To do that, head up to the Current File drop-down on the top right and select Edit Configurations. You need to create a new Run Configuration for your file:

Edit configurations selection in the Run Configurations menu

Click Add New Run Configuration and search for Python in the list. Name your run configuration main, change your script path to point to your main.py file and then add your BOT_TOKEN after as an environment variable after the existing one. It should look like this (but with your path and your BOT_TOKEN):

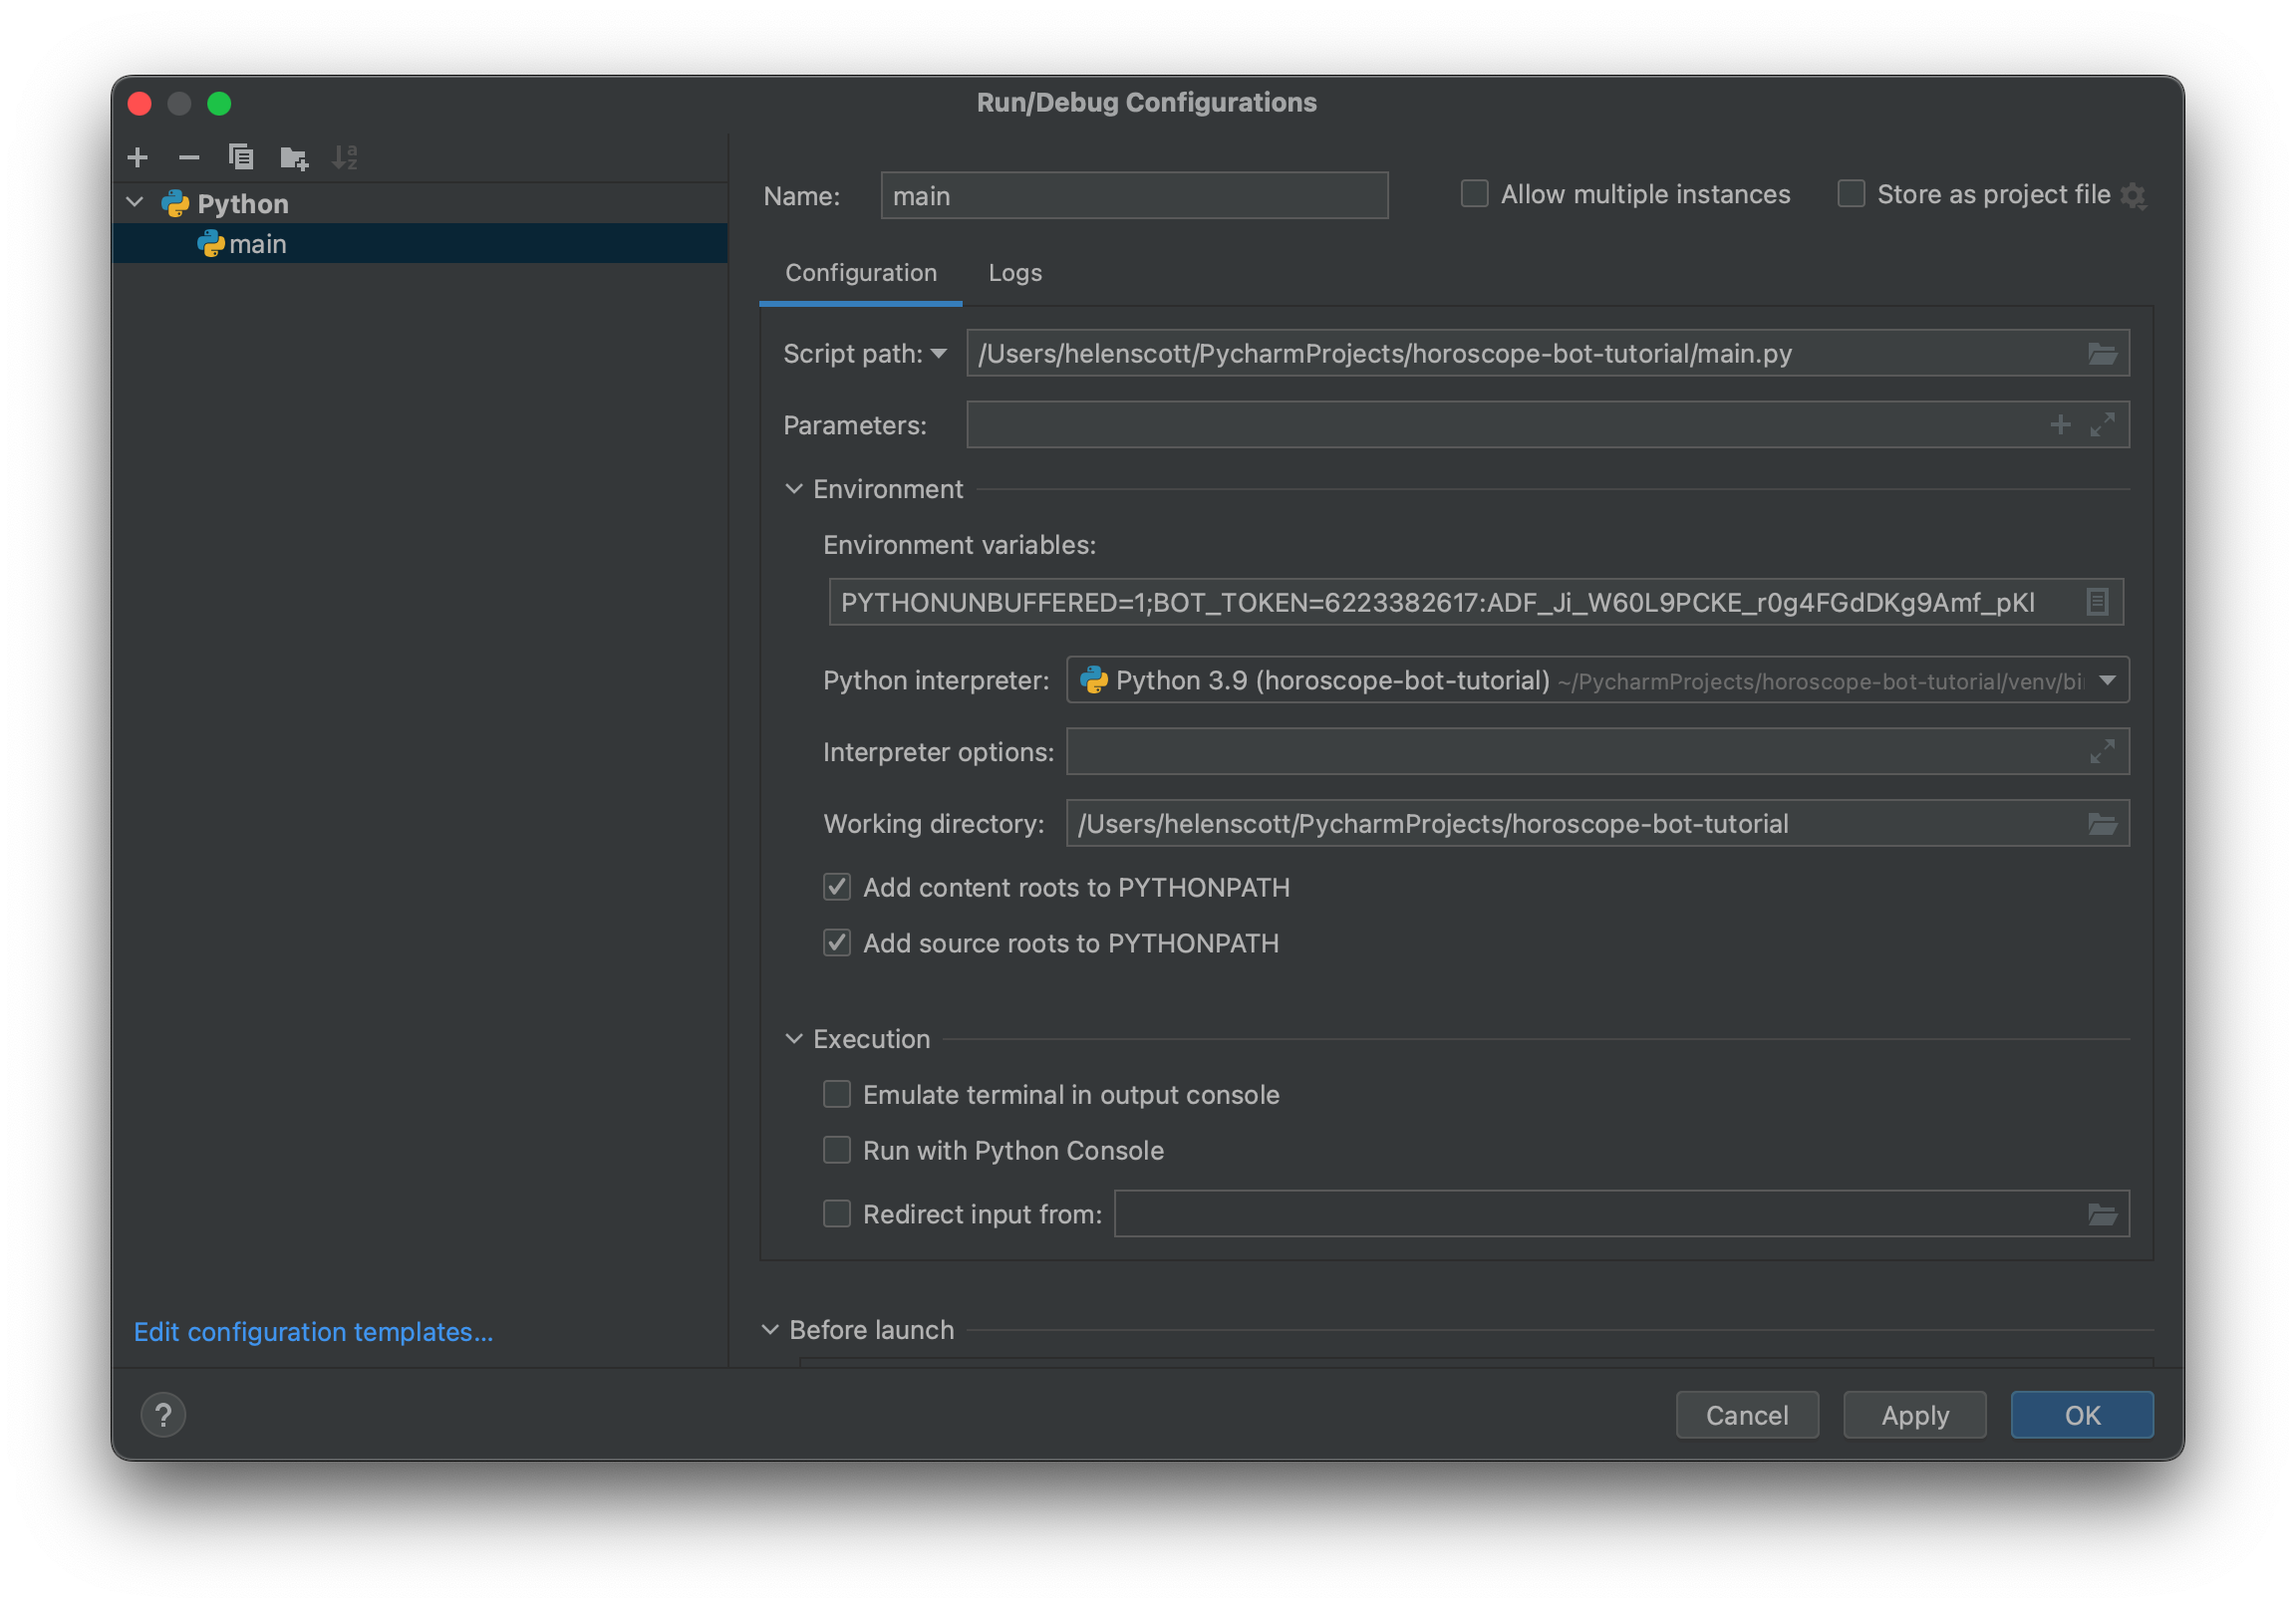
Click OK to save your Run Configuration before we go back to editing the code.

Let’s start to build our bot up now. Add the following code:

@bot.message_handler(commands=['start', 'hello'])
def send_welcome(message):
    bot.reply_to(message, "Howdy, how are you doing?")

Now we have a way to respond when someone types in either “start” or “hello” and we also reply to them. 

We really ought to test it at this point so add this line of code to ensure the bot will keep listening to us:

bot.infinity_polling()

An important note here! The above line needs to be at, and remain at, the bottom of your file and not indented. I’ll remind you later in case you forget too.

Pause and Test!

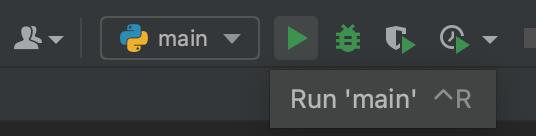
You can run your application with the Run Configuration you created by taking your mouse up to the main (the name of your file) and clicking the run arrow to the right. Alternatively you can right click in your file and select Run ‘main’.

Run main.py button

Now pick up your phone, open Telegram and search for your bot name such as horoscopefinder (my bot). Now type in /hello.

Telegram should respond with “Well hello there! How are you doing?”. Quick cross-check, if it’s not working, check that you have put your BOT token in correctly. Ensure it’s in single quotes if you put it in the Telebot argument and ensure there’s a semi-colon separating arguments if you put it in the run configuration as an argument.

Your code at this stage should look like this (assuming you used a Run Configuration in PyCharm):

import os
from telebot import TeleBot

BOT_TOKEN = os.environ.get('BOT_TOKEN')
bot = TeleBot(BOT_TOKEN)

@bot.message_handler(commands=['start', 'hello'])
def send_welcome(message):
    bot.reply_to(message, "Howdy, how are you doing?")

bot.infinity_polling()

Building up the Bot

So what’s next? Let’s add some code to call the API we’re using in this tutorial:

def get_daily_horoscope(sign: str, day: str) -> dict: 
"""Get daily horoscope for a zodiac sign.
Keyword arguments:
sign:str - Zodiac sign
day:str - Date in format (YYYY-MM-DD) OR TODAY OR TOMORROW OR YESTERDAY
Return:dict - JSON data """
url = "https://horoscope-app-api.vercel.app/api/v1/get-horoscope/daily"
params = {"sign": sign, "day": day}
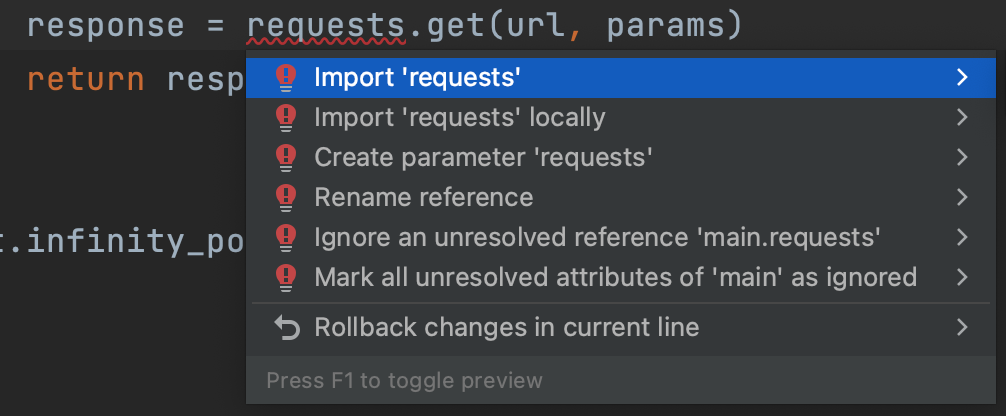
response = requests.get(url, params)
return response.json()

You’ll notice that requests has a red squiggly line under it. Pop your caret in the code and use (⌥⏎ | Alt+Enter). We want to import requests. PyCharm will add the import for you.

Alt Enter and then Import Requests

At this stage, you may also have a squiggly line under the line that starts with def. If you do it’s likely an indicator that your file isn’t formatted properly according to Python’s standards. When you hover your mouse over it you’ll get a popup about PEP 8 standards. You can either use (⌥⏎ | Alt+Enter) and select Reformat this file or Reformat the file (⌥⌘L | Ctrl+Alt+L) to banish the squigglies from your code. If you have more red in your code at this stage, check you have indented your function as I’ve shown above, sometimes indentation can get lost if you copy and paste it.

Sending out bot /hello and /start is cute, but we want to trigger a workflow when a user interacts with our bot and types in /horoscope so add the following code:

@bot.message_handler(commands=['horoscope'])
def sign_handler(message):
user_input = "What's your zodiac sign?\nChoose one: *Aries*, *Taurus*, *Gemini*, *Cancer,* *Leo*, *Virgo*, *Libra*, *Scorpio*, *Sagittarius*, *Capricorn*, *Aquarius*, and *Pisces*."
sent_msg = bot.send_message(message.chat.id, user_input, parse_mode="Markdown")
bot.register_next_step_handler(sent_msg, day_handler)

This tells the bot that when it receives /horoscope it needs to ask us what are star sign is before calling register_next_step_handler for the bot. You’ll notice that it takes two arguments and right now, our application has no idea what day_handler is. Let’s create that function next:

def day_handler(message):
    star_signs = ["Aries", "Taurus", "Gemini", "Cancer", "Leo", "Virgo", "Libra", "Scorpio", "Sagittarius", "Capricorn", "Aquarius", "Pisces"]
    text = "What day do you want to know?\nChoose one: *TODAY*, *TOMORROW*, *YESTERDAY*, or a date in format YYYY-MM-DD *up to a year ago*."
    sent_msg = bot.send_message(message.chat.id, text, parse_mode="Markdown")
    bot.register_next_step_handler(sent_msg, fetch_horoscope, star_signs)

Now we need to create the function for fetch_horoscope. Add the following code:

def fetch_horoscope(message, sign):
    day = message.text
    get_horoscope_data(day, message, sign)

Last but not least, let’s add the function for get_horoscope_data so add the following code:

def get_horoscope_data(day, message, sign):
    horoscope = get_daily_horoscope(sign, day)
    data = horoscope["data"]
    horoscope_message = f'*Horoscope details for {sign}, {data["date"]}*: {data["horoscope_data"]}'
    bot.send_message(message.chat.id, "Here's your horoscope!")
    bot.send_message(message.chat.id, horoscope_message, parse_mode="Markdown")

It’s testing time!

Before you fire up your application, two very important notes:

  • Make sure you stop it if it’s still running from last time. You can do this with the red square next to main in the top-right of PyCharm in your Run Configuration again. 
  • Make sure the line bot.infinity_polling() that we added at the start is at the end of the file and not indented.

Send /horoscope to your bot and see what happens! The code for this snapshot in time is on GitHub in case you get stuck or something has gone wrong.

Adding a requirements.txt file

It’s all well and good having the three imports at the top of the file, but if you want anyone else to be able to use this code, it’s best practice to add a requirements.txt file.

Open up the Project tool window if it’s not already open with (⌘1 | Alt+1), and in your root directory do (⌘N | Alt+Ins) then select New File and call it requirements.txt.

Head back to your main.py file. You can do that with (⌘[ | Ctrl+Left Arrow), or use Recent Files (⌘E | Ctrl+E). You’ll see that the squiggly lines are back under requests and telebot. Use (⌥⏎ | Alt+Enter) on one of them and select Add imported packages to requirements. PyCharm will add both packages to your requirements.txt file so now other users of your code will know that they need those libraries to run your code. There’s no squiggly line under os because that import is part of Python already, so anyone who wants to use your code won’t need to download that package separately.

Check everything still runs before we move on. Again there’s a snapshot in GitHub.

Tidying up that string

Time to do some small refactoring. You’ve probably noticed that we’re using the same string of star signs twice, so let’s deal with that to start with. In your day_handler function, click on the star_signs array and then do (⌃T | Ctrl+Alt+Shift+T) and select 4 Introduce constant. I called mine STAR_SIGNS. Now delete that line because you can just call the constant in this method:

bot.register_next_step_handler(sent_msg, fetch_horoscope, STAR_SIGNS)

We can also use the same constant in our sign_handler function by making it an f-string. That is a string that also accepts expressions. Take this string:

user_input = "What's your zodiac sign?\nChoose one: *Aries*, *Taurus*, *Gemini*, *Cancer,* *Leo*, *Virgo*, *Libra*, *Scorpio*, *Sagittarius*, *Capricorn*, *Aquarius*, and *Pisces*."

And rewrite it to this:

user_input = f"What's your zodiac sign?\nChoose one: {STAR_SIGNS}."\

This is a good time to mention the f-string in Python which we’ve used above. The f stands for “formatted”; this article is helpful for learning more about f-strings. To create one you just use the f character before you start your string then you can use curly brackets to denote the function, in this case, it’s our string constant.

Fix a little bug

If you’ve been playing around with your horoscope bot you’ve probably noticed two things. Firstly that it’s very easy to break it – we will fix that up shortly by adding some validation. Secondly, you may have noticed that the string it returns when you ask for your horoscope is incorrect. The bot is returning:

Horoscope details for [‘Aries’, ‘Taurus’, ‘Gemini’, ‘Cancer’, ‘Leo’, ‘Virgo’, ‘Libra’, ‘Scorpio’, ‘Sagittarius’, ‘Capricorn’, ‘Aquarius’, ‘Pisces’], Mar 1, 2023: Today <some horoscope text here>

When it should be returning something like:

Horoscope details for Aries Mar 1, 2023: Today <some horoscope text here>

Let’s fix that now. The function that controls this is get_horoscope_data. The string it’s using is:

horoscope_message = f'*Horoscope details for {sign}, {data["date"]}*: {data["horoscope_data"]}'

It seems okay, but take a closer look. The {sign} function appears to be the full array of strings, whoops!

Let’s revisit our day_handler function. The problem lies in this line:

bot.register_next_step_handler(sent_msg, fetch_horoscope, STAR_SIGNS)

We’re passing the whole string array through (STAR_SIGNS) rather than parsing it at this stage and converting the user input into text. First, let’s fix that and add a new line above that says:

sign = message.text

Now instead of passing our constant STAR_SIGNS in, let’s pass in sign. We can also delete:

star_signs = STAR_SIGNS

The final code should look like this:

def day_handler(message):
    sign = message.text
    text = "What day do you want to know?\nChoose one: *TODAY*, *TOMORROW*, *YESTERDAY*, or a date in format " \
           "YYYY-MM-DD *up to a year ago*."
    sent_msg = bot.send_message(message.chat.id, text, parse_mode="Markdown")
    bot.register_next_step_handler(sent_msg, fetch_horoscope, sign)

Now would be an excellent time to test your bot again! The snapshot of the code is on GitHub for you.

Validation, we need some!

As I mentioned earlier, if you’ve been playing with your horoscope bot and potentially doing anything other than handling it very gently, it’s probably broken on you at least once. It would be good to make it a little more sturdy, and to do that we need to add some validation to our user inputs. Remember, our user inputs are our star sign and the date.

Validating the star sign

This is arguably the easiest validation to manage because we just need to check that it’s a string and that it’s one of the strings we allow. We can use the day_handler function to manage this.

We already know what the valid star signs are because we’ve stored them in the constant STAR_SIGNS. We can check if what the user typed is in our constant with an if statement, but what do we do if it’s invalid? In that case, we first craft a sassy response to the user. Then we pass that response to the bot and send the application back to asking for their star sign.

def day_handler(message):
    sign = message.text
    if sign in STAR_SIGNS:
        text = "What day do you want to know?\nChoose one: *TODAY*, *TOMORROW*, *YESTERDAY*, or a date in format " \
           "YYYY-MM-DD *up to a year ago*."
        sent_msg = bot.send_message(message.chat.id, text, parse_mode="Markdown")
        bot.register_next_step_handler(sent_msg, fetch_horoscope, sign)
    else:
        not_valid = "That was not a valid star sign, try again!"
        bot.send_message(message.chat.id, not_valid)
        sign_handler(message)

Pause here and test that out, try entering all sorts of junk for the star sign. Does something still break? If you tried entering your star sign in anything other than exactly how it’s spelt out in the STAR_SIGNS constant then yes, it will still break! Let’s fix that next.

Locate this line in your day_handler function:

sign = message.text

and change it to:

sign = message.text.title()

Now stop and restart your bot and test it out; problem solved! The title method just converts the user input to the format that we’re expecting.

Validating the date

This is a slightly juicier challenge because the date can either be a string (TODAY, TOMORROW, YESTERDAY) or a date in the format YYYY-MM-DD. First, we need to check what kind of input the user has given us, a string or a date. We will manage this validation inside our fetch_horoscope function.

First, let’s validate if it’s a day or a date; add the following code below the existing code:

valid_days = ["Today", "Tomorrow", "Yesterday"]
if day in valid_days:
    get_horoscope_data(day, message, sign)
else:

You will get an error because we’ve not yet crafted the else portion of the validation. But what we’ve done here is checked if it’s a string that is one of our valid days. If it is, call get_horoscope_data and pass it through. However, if it’s not. it gets fun because we know it’s not a valid string, but it could be a date. And, if it’s a date, we need to check that it is:

  • In the range of the API (which means less than 365 days in this case and not in the future)
  • Of the right format

Let’s do this using a try and except statement to allow us to deal with the error that the program will throw if it gets to the end of the validation and the user has put in garbage.

Add the following code to the else portion of your code block:

else:
    # Validate that it's a date in the right format
    try:
        date_object = datetime.strptime(day, '%Y-%m-%d')
        # Validate if it's in the prior year
        now = str(datetime.now())
        if day < now:
            earliest_valid_date = datetime.now() - timedelta(days=365)
            # Validate if the date is in the future
            if date_object >= earliest_valid_date:
                get_horoscope_data(day, message, sign)
            else:
                date_too_old = "The date is too far in the past for my tiny brain, try again"
                bot.send_message(message.chat.id, date_too_old)
        else:
            not_valid = "Date is in the future, try again."
            bot.send_message(message.chat.id, not_valid)
    except ValueError:
        invalid_format = "Incorrect data format, should be YYYY-MM-DD"
        bot.send_message(message.chat.id, invalid_format)

You’ll notice that you once again have red squiggles in your code. Use (⌥⏎ | Alt+Enter)  on datetime and select Import this name then datetime.datetime.date

Use (⌥⏎ | Alt+Enter) and select Import timedelta(SupportAbs) from datetime. You’ll notice that PyCharm has added an additional import statement at the top of your class:

from datetime import datetime, timedelta

First, we validate that the date (if it even is a date) is of the correct format; if it’s not, the code will drop through to the except portion of the statement and dish out the error to the user.

Next, we validate if the date is within the range we expect. To do that, we first need to know where we are in time and space, the now variable. Again if we hit either of these nested else statements, we notify the user and then drop through to the except statement.

Time to test your bot again! This time try and break it, channel your inner tester and test your validation. Some corner cases have still not been handled, but I’ll leave those with you! The code at this point is on GitHub, as always.

Refactor to improve readability

You’ve probably noticed that our fetch_horoscope function is a bit ugly and long now. We can do a quick refactor to dramatically improve the readability of our code by extracting the date validation into a function. Select the following code:

if day < now:
    earliest_valid_date = datetime.now() - timedelta(days=365)
    # Validate if the date is in the future
    if date_object >= earliest_valid_date:
        get_horoscope_data(day, message, sign)
    else:
        date_too_old = "The date is too far in the past for my tiny brain, try again"
        bot.send_message(message.chat.id, date_too_old)
else:
    not_valid = "Date is in the future, try again."
    bot.send_message(message.chat.id, not_valid)

Use (⌃T | Ctrl+Alt+Shift+T) and select option 6 Extract method. Type in a name for the new method, such as date_validation, accept the defaults and let PyCharm extract that validation to its own function to tidy things up. And there we go. This code is also on GitHub.

A final bug

I managed to introduce a bug while I was creating this tutorial! This bug isn’t in the code on GitHub because I had commented the line out but if you have been pasting the code snippets in then you probably have it too. 

Test your bot with a date in the future and see that it tells you that the date is in the future but it also prints out an erroneous horoscope message for today’s date. 

Check your fetch_horoscope function and remove the first instance of this call:

get_horoscope_data(day, message, sign)

That line should only be called in the if statement if the day is one of our valid days. And this is why you should delete commented out code!

Phew! We got there 🙂

Here’s the final code in case you need to compare yours, but I hope yours works!

Getting started with IntelliJ IDEA

First up, I have created a tutorial on the IntelliJ IDEA Guide if you want to view the content with videos. I’ll concentrate on text-based for this blog post.

When someone new joins your team, it can be quite an overwhelming experience. There are lots of people to meet, new technologies to learn, different processes to learn and of course, an IDE to learn! It’s helpful to remember what every new starter wants – they want to make a difference, they want to add value, they want to move the needle.

I have created these tips and grouped them to help everyone who is new to IntelliJ IDEA learn in logical groups. You don’t need to know everything in the IDE to be a badass developer, but learning a bunch of functionality that will help you to go faster in 80% of cases is a great way to start. I’ve ordered these tips in the order you’re most likely to want to get to grips with them, but feel free to choose your own adventure!

Working together

There really is no substitute for sitting next to someone and pairing on something in the IDE; it’s a great way to learn a bunch of new keyboard shortcuts and see how your peers use the tool. However, the world was reshaped a few years ago, and now remote working is commonplace, which means you may not be co-located with your peers to benefit from this way of learning. This is where JetBrains Code With Me can add a lot of value, especially if you use it with the Presentation Assistant plugin loaded so you can see the host’s keyboard shortcuts. There are some licensing considerations to be aware of, but it’s available in IntelliJ IDEA Community edition for individual users of up to 3 users for 30 minutes for free.

You can watch these videos to learn more about Code With Me:

And read about it on the JetBrains blog:

…. and finally, the step in the IntelliJ IDEA Guide.

Learning the IDE

This one seems kinda obvious… of course, you want to Learn the IDE; that’s why you’re here! That said, you may not know about the Feature Trainer because it’s a relatively recent addition to the product. You can access the Feature Trainer from the home page by clicking on the Learn tab, or, if you’re already in a project, go to Help > Learn IDE Features.

The current lesson list is:

  • Onboarding tour
  • Essential
  • Editor basics
  • Code completion
  • Refactorings
  • Code assistance
  • Navigation
  • Run and debug
  • Git

Each of these has several lessons within it that take you through a feature that can help you in your workflow. Even not-so-new-starters can learn something from the Feature Trainer, so go ahead and check it out on a Friday afternoon when you have some headspace to learn something new.

…. and finally, the step in the IntelliJ IDEA Guide.

Customising your IntelliJ IDEA Environment

Since we spend a large portion of our day working inside the IDE, it’s reasonable to assume that we will want to customise it for our eyes. Of course, this is separate to code style, which should be standardised across the team you’re working with; that’s one advantage of checking in your `.idea` file. When you’re new to IntelliJ IDEA, the Preferences/Settings dialog (⌘, | Ctrl+Alt+S) can be quite daunting but you can search for what you’re looking for, such as “theme”, “keymap”, “plugins” or “font”.

…. and finally, the step in the IntelliJ IDEA Guide.

Navigating Code

One of the first tasks you have when you are getting to know a new codebase is how to move around it. Again there are lots of ways to do that in IntelliJ IDEA, but I’ve focused on the ones that I think are most helpful for new users. Of course, you can use the Project tool window to move around your files, but I recommend getting comfortable with both Recent Files (⌘E | Ctrl+E) and Recent Locations (⌘⇧E | Ctrl+Shift+E) as these can be thought of as your working context.

As you get more familiar with the structure of the codebase, I recommend you add Go To Declaration or Usages (⌘B | Ctrl+B) and Go to Implementation (⌘⌥B | Ctrl+Alt+B) to your repertoire.

Finally, as you start to figure out your workflow you may need to move between files in a sequential order; this is where (⌘[ | Ctrl+Alt+←) to go backwards and (⌘[ | Ctrl+Alt+→) to go forwards comes in.

…. and finally, the step in the IntelliJ IDEA Guide.

Finding Code

As you move from looking around the code to looking for specific code that performs a task, you can get a lot of support from your IDE. Search Everywhere (⇧⇧ | Shift+Shift)  and Find Action (⌘⇧A | Ctrl+Shift+A) are great ways to narrow down your search in the first instance. As you progress to more specific searching, I recommend you check out Structural Search by using either Search Everywhere or Find Action and typing in “structural”. You can then build your own queries as required. There’s an example in the link below for the IntelliJ IDEA Guide.

…. and finally, the step in the IntelliJ IDEA Guide.

Reading Code

As we all realise as we progress through our careers, we spend more time reading code then writing it. Maybe we wrote that code, or someone else wrote that code; either way you often need to understand what some code does.

Tools you can use to help you read code include Inlay Hints, which you can turn on and off in the Settings and Preferences (search for “inlay hints”). These decorate your code with annotations that can help you to understand the flow of data.

The scrollbars are another great source of information. Coloured blocks on the left-hand scroll bar show you if code has been added, deleted, changed or has an error in for the code you are currently viewing. The right-hand scrollbar shows you the same information for the whole file so you can see at a glance without scrolling if you have any errors and if everything is as you expect it to be.

Finally, sometimes you’re reading code because you’re fixing bugs. IntelliJ IDEA has an Inspections Widget, which appears at the top right of the file by default. This tells you the state of the file and if there are any errors. You can either click on it to open the Problems tool window, go to the next error directly with (F2 | F2).

…. and finally, the step in the IntelliJ IDEA Guide.

Understanding Code

When you come across a block of code that you don’t fully understand, you can use Context Actions (⌥⏎ | Alt+Enter) to see if IntelliJ IDEA has any suggestions for reshaping the code without changing what it does. This is worth doing even if there’s no highlighting on the code to indicate a potential refactor.

IntelliJ IDEA also allows you to Find the Type (⌃⇧P | Ctrl+Shift+P) which can be a helpful shortcut to remember, especially when you’re working with larger, more complex blocks of code.

Finally, you can analyse the flow of data through your code with Code > Analyze Code > Data Flow to Here and to analyse data flow downstream use Code > Analyze Code > Data Flow from Here. Using data flow analysis allows you to track both the data input (producer) and as the data output (consumer).

…. and finally, the step in the IntelliJ IDEA Guide.

Writing Code

Writing code is of course part of our day job and, again an area that IntelliJ IDEA can support you. As you’d expect from your IDE, IntelliJ IDEA gives you extensive code completion including Type-Based completion (⌃␣ | Ctrl+Space), which filters the list to only types that apply to that specific context. Support for code generation is extensive. You can use (⌘N | Alt+Ins) both in the Project tool window and in the editor to generate new files and common code constructs.

Similar to Search Everywhere, IntelliJ IDEA supports Running Anything (⌃⌃ | Ctrl+Ctrl) which you can use to run any of your Run Configurations as well as scripts and commands such as `mvn clean` or `gradle –status`.

Lastly, IntelliJ IDEA has recently made a number of changes to support you in managing dependencies. You can use the new Dependencies tool window to view and update your dependencies using the Package Search functionality.

…. and finally, the step in the IntelliJ IDEA Guide.

Changing Code

Changing code is one of those inevitabilities in our jobs. Perhaps we’re refactoring it, adding functionality or deleting it; either way, you will be changing some code you or someone else wrote at some point. Use (⌃T | Ctrl+Alt+Shift+T) to pop up the refactoring menu. Once you’ve refactored code, you can reformat the code with (⌥⌘L | Ctrl+Alt+L).

Maybe you want to make the same change in multiple places; IntelliJ IDEA allows you to create multiple carets either in a stacked list or randomly as required. ( | Ctrl) twice, holding it down the second time and then pressing the Down arrow to create a stack of carets or by clicking in your code to add a caret. You can learn more about this feature from this blog post on foojay.

Sometimes, especially with long blocks of code or poorly formatted code, it’s hard to see where scope starts and stops. You can use (⌥↑ | Ctrl+W) to expand the scope and (⌥↓ | Ctrl+Shift+W) to collapse the scope.

IntelliJ IDEA supports as many clipboards as you need meaning everything you copy inside IntelliJ IDEA is available for you to paste, even if it wasn’t the last thing you copied. One of my favourite features is being able to copy multiple things and then pasting them in one list from the Clipboard History (⌘⇧V | Ctrl+Shift+V).

Lastly, sometimes things go wrong, and it can seem like you’ve lost your work. IntelliJ IDEA takes snapshots of your code while you work (no save necessary!) when certain events happen. Those events might be refactoring a piece of code, a test passing or failing, or some other change you make. These changes are stored as your Local History. While it is not a substitute for a version control system such as Git, Local History can step in and help when things take an unexpected turn. You can access Local History from the right-click context menu both at the directory level in the Project tool window and on an individual file basis. The diff view it provides allows you to select which changes you’d like to restore to your file, or perhaps the whole file!

…. and finally, the step in the IntelliJ IDEA Guide.

Testing Code

Of course, you want to test your code! Perhaps you’re even doing TDD, but how can IntelliJ IDEA help you here? First up, you can split windows in the editor, allowing you to have your code on one side and your test on the other so you don’t have to flick between them. You can open any file from the Project tool window in a right split by holding down ( | Shift) when you press ( | Enter). The same tip works to open a file from the Recent Files dialog (⌘E | Ctrl+E).

Sometimes it’s helpful to jump from the file to its associated test if it has one. If you’re in a class and use Navigate to Test (⇧⌘T | Ctrl+Shift+T), IntelliJ IDEA will look for a test that it thinks tests that file. For example, if your class is called BlueMoon, IntelliJ IDEA might reasonably assume that a file called BlueMoonTest is in fact the test for that file and take you there. If you use Navigate to Test and IntelliJ IDEA can’t find a test class it will suggest creating a new one for you and offer to generate some test method code constructs.

…. and finally, the step in the IntelliJ IDEA Guide.

Seeing How Far You’ve Come

The Productivity Guide in IntelliJ IDEA is a fun way to see which shortcuts you have used and which you have yet to try. You can access it from Help > My Productivity. Check it out to see what you could learn next!

…. and finally, the step in the IntelliJ IDEA Guide.


Python you say?

In the spirit of trying to write more regular shorter blog posts I shall start with a small announcement! I am now doing some Python advocacy at JetBrains.

For all you Java folk, I’ll still be doing some Java advocacy, amplifying cool Java stuff on the socials and creating content, for example on the IntelliJ IDEA Guide. My Python journey is just beginning and I will share as much of it with you as possible. If you know of any awesome Python folk and resources in the community, I’d love to hear about them, please drop me a comment here or on the socials.

Starting a new challenge is always exciting, but I’m hopeful that with my passion for learning and sharing that journey to help others I can bring value to the community. I’m excited to work more with folk like Paul, Jodie and Benjamin, while still collaborating with other awesome developer advocates who amplify Java at JetBrains including, but not limited to, Marco, Marit and Mala. Fortunately, now I am working with Python I won’t need to change my name to something starting with “M”!

Using Code With Me to Collaborate on Getting to Know IntelliJ IDEA

As I’m sure you remember, back in March 2020 the office dwellers were sent home indefinitely. I recall my colleagues expressing opinions from “this is silly and will only last a week” to “this marks the point the world changes forever”; those in the latter group were much closer to reality. I was on holiday at the time so when I returned, I duly drove into the office, loaded everything from my desk into my car and settled into working on the dining room table – sound familiar?

After a few months of working at the dining room table we too moved from “this is silly” to “the world is changing”. I made space in our tiny box room and tried to make a workspace that was conducive to productivity. Another few months passed and a series of fortunate conversations led to me interviewing at JetBrains for a Java Developer Advocate. They hired me (yay!) and I started my new job in July 2020. That was it, I was one of them, I was remote, but I wasn’t alone.  

JetBrains Code With Me entered the Early Access Program (EAP) a couple of months later. I didn’t realise at the time just how central Code With Me would be in my life in the next two years. As Trisha mentions in this blog post, our book Getting to Know IntelliJ IDEA was born at the same time. Given that we were both Java Developer Advocates at JetBrains at the time (Trisha has since left) and working in different countries, we took the most obvious route for book collaboration – Code With Me!

For those of you who don’t know what Code With Me is, the tl;dr is a collaborative programming service. Code With Me allows you to invite others to join you in your IDE, even if they don’t have IntelliJ IDEA installed. Many of you will be familiar with pair programming and you’ve likely done a bit of it in your time. Swarm programming is similar just taking the number of participants to a bigger number than the 1-1 mapping you get in pairing.

Of course with Trisha and myself, we were a pair so no swarming was required. The most common pairing model is where one person navigates and another person drives, but I am getting ahead of myself; back to Code With Me!

The product was in its infancy back then but I’m going to describe the modern-day experience! Let’s start at the beginning, you need the Navigation Bar on to access Code With Me. By the way I’m using the new UI in IntelliJ IDEA because I prefer it. If you haven’t enabled it yet you can do so in IntelliJ IDEA 2022.3 by going to your Settings/Preferences and then searching for “new UI” and enabling it. You’ll need to restart your IDE but then you’ll go from this:

Old Navigation Bar in IntelliJ IDEA

… to this! 

New Navigation Bar in IntelliJ IDEA

However, whatever UI you’re using, the most important icon for today is the Code With Me one:

Code With Me Icon

When you click this, you have three options. We will come back to Start Session in a moment. Permissions allows you to change the permissions that a new session starts with and gives you a finer level of control over what those joining your IDE session can, and of course, can’t do. 

Join Session allows you to join another IDE Code With Me session from your full IDE. It’s worth mentioning again that you don’t need to use your IDE to join someone else’s CWM session, but the option is there.

Back to Start Session, this does exactly what you’d expect. It allows you to initiate a new Code With Me Session, tweak the permissions you want to assign those connecting to your IDE and creates a custom link that you can share with people you want to invite to collaborate. The permissions are grouped into Read-only, Edit Files, Full Access and Custom. For each of these levels you can further define them at a lower level if you want to. For example, I can select Edit Files but then also give them access to run and debug functionality, whereas this is disabled by default with the Edit Files permission set.

Once you’ve settled on the permissions, you can click Start Session. IntelliJ IDEA will copy the link to your clipboard and you can share it with others. Here it is in action:

Once you’ve sent the link over to the people you want to join your session via Slack, JetBrains Space, MS Teams, Twist, Whatsapp, Signal, Telegram or Apple iMessage (did I get them all?) they can paste that link into their browser of choice to initiate the connection The recipient’s machine does not need to have the IDE installed, the guest’s JetBrains client connects to the host’s machine and you’ll be able to work inside their IntelliJ IDEA within the constraints of the permissions the host granted you when they created the Code With Me session.

Trisha and I used Code With Me extensively throughout the creation of our book, Getting to Know IntelliJ IDEA. We loved the fact that you get code completion and the IntelliJ IDEA experience even without the full IDE. We also used the call feature extensively; be aware that Code With Me will mute your audio and turn off your video when anyone else joins the Code With Me session so don’t forget to renable them!

We naturally fell into the pattern of me being the driver and Trisha being the navigator. That meant that I, as the driver would fire up a Code With Me session and send the link over to Trisha, the navigator. However, because we were using Code With Me we weren’t constrainted to this model, we frequently reversed it and I did more talking while Trisha did the editing.

Here you can see the guest on the left and the host on the right-hand side:

Once you’re done collaborating, it’s worth knowing that changes from different authors go into different changelists. This is by design so you can see who has changed what, however, you must remember to drag changes from the contributors into one single changelist if you want to commit them all; IntelliJ IDEA does not allow you to commit multiple changelists (rightly)!

Finally you must close your Code With Me session when you’re finished collaborating. You can do that from the same Code With Me icon and then click End Session, otherwise your friend might come along and leave comments in your code that you weren’t expecting!

Trisha and I covered Code With Me along with lots of other features of IntelliJ IDEA in our book which you can buy directly from Leanpub

Getting to Know IntelliJ IDEA book cover

Getting to Know IntelliJ IDEA Book Launch!

On November 6th 2022, Trisha and I launched our book, Getting to Know IntelliJ IDEA. It’s taken us over two years to write, and it contains a wealth of information; in fact, it contains everything you need to get started using IntelliJ IDEA. We wrote the book because the tools we use matter, and being able to use them effectively improves our productivity and happiness. 

What’s in the book?

The book is over 350 tightly packed A4/US letter-sized pages. The eBook page count, of course, is much larger, at just under 1000 pages… That’s because there are plenty of:

…. annotated screenshots

Annotated screenshot from the book Getting to Know IntelliJ IDEA

… guided tutorials

Tutorial excerpt from the book Getting to Know IntelliJ IDEA

… helpful use cases

Helpful information from the book Getting to Know IntelliJ IDEA

… chapter introductions

Chapter introduction from the book Getting to Know IntelliJ IDEA

… chapter summaries

Bottom Line from the book Getting to Know IntelliJ IDEA

… and that’s before we get started on the Trisha Tips

Trisha Tip from the book Getting to Know IntelliJ IDEA

… and Helen Hints:

Helen Hint from the book Getting to Know IntelliJ IDEA

… plus much more!

How is the book structured?

The book is split into four parts, each of which has a different goal so that you can either read the book front to back, which I recommend if you’re new to IntelliJ IDEA, or you can dip in and out as you need to which more experienced users may want to do.


Part I lays the foundations of what IntelliJ IDEA is, what the key elements of the interface are, and how you can get the most from them. It also introduces the three guiding principles for IntelliJ IDEA:

  • Always Green – IntelliJ IDEA strives to keep your code compiling by flagging errors as they happen and assisting with keeping it syntactically correct.
  • Keyboard First – Using IntelliJ IDEA’s keyboard shortcuts speeds you up in your day-to-day tasks. You probably won’t learn them all, but learning the ones you use helps keep you focused.
  • In the Flow – We all know the feeling when you’re happily coding and don’t want distractions; we have provided lots of tips and tricks to help you stay in this zone while using IntelliJ IDEA.

Part II builds on the foundations laid in Part I for writing and reading code, which is a huge part of our daily jobs. It introduces some key features that help do the heavy lifting in IntelliJ IDEA so you can focus on doing what you do best – figuring out solutions to problems! There are many opportunities for you to try stuff out with the code snippets we have provided, which are all available on GitHub.


Part III takes it to the next level and uses guided tutorials to show you how to open, run, test, and debug real applications. These tutorials get you up and running quickly and introduce you to IntelliJ IDEA’s features so you can explore them at your own pace. Part III also discusses working with dependencies, build tools and version control; central components for real-world applications.


Part IV is where the book pivots to specific functionality you can use in your day-to-day workflow. This is where you can discover areas of IntelliJ IDEA that you might not be familiar with. We’ve included many features that can support you and introduced the “Frequently Asked Questions” element to answer your questions. The Table of Contents gives you clues as to what’s in here!

Header 1 Header 2 Header 3
IntelliJ IDEA essentials

Fixing errors and warnings

Refactoring your code

Formatting and rearranging your code Benefiting from multiple clipboards Using Run configurations effectively
Diving into debugging Expanding on testing Building on build tools
Doing more with dependencies Making version control work for you Viewing and applying local history
Running commands in the terminal Managing work todos Pairing with code with me
Working with plugins Understanding Java in IntelliJ IDEA Looking in your .idea folder
Changing IntelliJ IDEA settings What to do when things go wrong  

Where do I find out more?

You can check out Getting to Know IntelliJ IDEA today and learn how to get the most from your IDE!

Header 1    


Ch-ch-ch-ch-changes (in the workplace)

Humans are not known for being amazing at managing change; at least, there’s definitely been plenty of times where I’ve not been amazing at it. I’m guessing if you’re reading this blog post then perhaps change is something that you’ve often pondered as well. We often cope with disruptive or stressful changes in our life with coping mechanisms but they are rarely early. I call them just-in-time coping mechanisms because we don’t usually know how we will react to a change before it happens, even if we can see it coming. It might be a so-called positive change, but those changes are still very capable of causing stress.

I gave this talk a little while back on this subject and this blog post is the summary in case, like me, reading is more your thing. I looked at the challenge of personal change management from two angles, firstly for leaders who are instigating a change and secondly for those who are impacted by a change. I predominantly focused on workplace changes but you can extrapolate many of these ideas to personal changes as well.

Do’s for leaders of a change

Let’s say you’re the one driving the change. Perhaps you’re leading a change to the processes your team use for code reviews, or perhaps you’re leading the whole team. If that sounds familiar, here are my top tips:

  • Be transparent; share as much as you can and share it in a timely fashion. Of course, as a leader, there may be some pieces of knowledge that you can’t share but the vast majority of the time it’s much better to be open and transparent with what you know (and what you don’t know).
  • Include people; share your leadership vision and why. If people know why you’re changing something, they are far more likely to not only help with the change but have a better experience throughout its life cycle.
  • Lift others up; be aware of whatever privilege you have and help others achieve their goals.
  • Give people choice; change is disruptive, maybe this change isn’t for everyone, always give and respect the choices people make.
  • Celebrate people; even those that leave your team; in fact especially those that leave your team! People leaving is not always a sign of a “bad manager” that’s a sweeping generalisation in my experience. Remember that person will still be talking about you and the company they left years after the event – make sure their memories are positive ones.
  • Plan people’s first day and onboarding meticulously; set people up for success. You’ve invested a lot of time and effort in them to get them to this point so set them up for success at each step of the way. First appearances really do matter. Give them a warm welcome.

Photo by Vlad Bagacian on Unsplash

Do’s for those impacted by a change

All of us will find ourselves in this group sooner or later, change is, after all, inevitable. If you’re impacted by a change, irrespective of if you saw that change coming, consider the following tips:

  • Find out more; get in front of it, especially if you didn’t see it coming. It’s vital that you inform yourself and get as much information as you can so you can make decisions as required.
  • Consider if you should cut your losses and move on; sometimes it’s just not worth it. If you’re not sure if it’s for you, give yourself a timescale in which to decide and give some thought as to what you need to find out before you can make an informed decision.
  • Give yourself time and space to the change; remember coping mechanisms are just in time and many things are improved with a good night’s sleep.
  • Don’t be afraid; you got this!

Photo by Sammie Chaffin on Unsplash

Remember!

Finally, here are a few points to remember about change:

  • Change is scary; informing yourself and giving yourself a timescale to respond to that change can help reduce the scariness level.
  • Change is inevitable; you will always be impacted by a change, and sometimes you will be the one driving the change. Try and enjoy it, or even thrive on it.
  • Change can lead to opportunities; sometimes staying put and accepting the change is in your best interests, sometimes it’s not.
  • You control more than you think you do; really you do!

Photo by Miguel Bruna on Unsplash

Five cool features in IntelliJ IDEA

Here are my top five cool features in IntelliJ IDEA. There are of course more than five, but that wouldn’t make a catchy blog title!

  • Management of JDKs
  • Code completion
  • On-demand error highlighting
  • Customization
  • Tight integration

#1 – Management of JDKs

IntelliJ IDEA does a fantastic job of managing your JDKs. You can download new JDKs and configure existing JDKs on your machine with IntelliJ IDEA. I created a tip for this on the IntelliJ IDEA Guide but the short version is – go to your Project Structure with ⌘; (macOS), or Ctrl+Alt+Shift+S (Windows/Linux), to view your Project Structure.

The SDK drop-down shows you all the JDKs that are configured for use with IntelliJ IDEA (assuming you’re using a Java project), then there is an option to Add SDK and finally, IntelliJ IDEA shows you a list of detected SDKs:

The top list outlined in orange is all the JDKs that I’ve configured for use with IntelliJ IDEA. The bottom list outlined in green is the detected SDK – that is all those on your machine that you’ve downloaded but are not yet being used by IntelliJ IDEA. The middle option, Add SDK, outlined in purple is where you can download a new JDK from different vendors to your machine by selecting Download JDK. You can also select JDK to browse to a JDK on your machine that exists but IntelliJ IDEA hasn’t detected. You can also download IntelliJ Platform Plugin SDKs and Android SDKs here.

When you select Download JDK you can choose your version and vendor and IntelliJ IDEA will download your chosen JDK and configure it with use with IntelliJ IDEA.

#2 – Code Completion

IntelliJ IDEA takes code completion to the next level. There’s Basic Completion, Advanced Completion, Live Templates, Postfix Completion, Statement Completion and more.

Here’s a whirlwind tour for you! Basic completion usually is available by default, but you can also invoke it with ⌃␣ (macOS), or Ctrl+Space (Windows/Linux). Smart completion or type-matching completion is similar to basic completion, but it only shows options for the current context. You can invoke smart completion with ⌃⇧␣ (macOS), or Ctrl+Shift+Space (Windows/Linux).

Live Templates are also a form of code completion that allow you to use abbreviations such as main that IntelliJ IDEA will convert to Java’s main method. There are dozens of live templates, and you can create your own!

Postfix completion is similar to live templates in some respects in that it also uses abbreviations but it helps you avoid backward caret jumps as you craft the code. It also allows you to manipulate existing code as you add the dot and then the abbreviation for the postfix completion you want to use, for example ifn for if null.

Finally, statement completion is one of my favourites because it adds the correct parentheses, braces, and semicolons to my code! The shortcut is ⇧⌘⏎ (macOS), Ctrl+Shift+Enter (Windows/Linux). This is just one you need to try out, granted three key presses is more than one semi-colon but it’s very helpful because it reduces errors in my code. I also find I can quickly use ⇧⏎ (macOS), or Shift+Enter (Windows/Linux) to create a new line – it’s just a syntactically pleasing combination!

#3 – On-Demand Error Highlighting

You can write code and see error highlighting in real-time in IntelliJ IDEA, no more waiting for the compiler; if your code isn’t going to compile, IntelliJ IDEA will tell you about it straight away. I prefer to fix errors as they happen, usually with Quick Intentions which is ⌥⏎ (macOS), Alt+Enter (Windows/Linux). IntelliJ IDEA helpfully gives you a little red light-bulb when there’s an error with your code:


Alternatively, you can use F2 to navigate to each error in your Project or use the Problems tool window which is ⌘6 (macOS), or Alt+6 (Windows/Linux) to get an overview of any problems across your project.

If you search the IntelliJ IDEA tip page for “quick intentions” it will give you a flavour of some of the ways it can help.

#4 – Customisation

I would be remiss if I didn’t mention how much I love being able to customise IntelliJ IDEA. Fortunately, it comes packed with sensible default options but equally allows you to customise these over time as you get more familiar with the product. Of course, I don’t use 95% of the customisations but the point is that I can and many people in the community do. That said, the 5% I do use makes my authoring experience a more enjoyable and productive one. The best way to get an idea of what IntelliJ IDEA is capable of in the customisation department is to go to your Settings/Preferences with ⌘, (macOS), or Ctrl+Alt+S (Windows/Linux). You can then browse and view the groupings on the left such as Appearance & Behavior and Editor. My favourites customisation are:

#5 – Tight Integration

I couldn’t come up with a better name for this one, but fundamentally it’s the integration part of the IDE. It’s easy to take this part for granted because IntelliJ IDEA makes it look easy, however integration with tools such as Git, Maven, Gradle, Docker and more in both IntelliJ IDEA Community Edition and IntelliJ IDEA Ultimate.

Having a one-stop shop for all your coding needs really is a productivity boost, plus there’s no more faffing about configuring external tools to work with your coding tool because it’s all neatly integrated!

The Great Resignation – So good I did it twice

Three months ago I left JetBrains because I took an opportunity at MongoDB as a Keynote Storyteller. Today I am returning to JetBrains as a Java Developer Advocate.

But that’s what a probation period is for, right? It’s a chance for the company to check out if you’re a good fit for them and more importantly, for you to check out if they’re a good fit for you. The probation period is a chance to test theories, form hypotheses and have new experiences.

In the last few weeks, while in my probation period at MongoDB, I realised two things. Firstly that it wasn’t a good fit for me, and secondly that I missed the work I was doing at JetBrains and the people I was doing that work with. Plus, life is short; we all have to find our own way.

I consider myself very fortunate, and I’m grateful to my colleagues for welcoming me back to a role where I know I can add value and work with the diverse and talented Java community once again.

I’m looking forward to continuing work on the IntelliJ IDEA Guide, creating videos for our YouTube channel, as well as getting to know the amazing Java community better. Trisha Gee and I are also busy on our book Getting to Know IntelliJ IDEA! I’ll share more updates once I’m re-settled and up to speed!

Let’s do this!

Small plant growing in someone's hands

It’s not just me, is it?

The 35 Stages of Creating a Conference Talk

You may well have heard of the five stages of grief, well in this blog post we’re going to cover the 5 stages of creating a conference talk. And then 30 more.

Before these five stages comes a crucial first step. It’s the one where you see a conference CFP, and you’re already at least 1.5 gin & tonics in because it’s 7 pm on a Saturday (or Tuesday, whatever). Before you know what has happened, you’ve come up with a suitably smart-sounding talk title and abstract, and you’ve submitted it grinning to yourself at your play on words. Then you get on with your evening and forget about it. You forget about it until, with a bit of luck, you get an email six weeks later that says something like, “Congratulations! Your talk has been accepted at <insert conference name here>.”

You cast your mind back to that Saturday night, but your memory is hazy. Still, it seems like a good idea, all you have to do is write the talk; the idea was the hard part! So you graciously accept the invite because it’s eight weeks away and then… read on.

Actual timelines may vary – not to be used as a project management tool unless you’re me.

Stage one – Denial

T-8 weeks, I bury my head in the sand and pretend that I didn’t just say yes to a conference that’s in eight weeks for a talk that I haven’t yet written.

Stage two – Anger

T-7 weeks, I start asking myself questions such as:

  • Why did I say yes to this? What was I thinking?!
  • This is stupid; I don’t want to do this/I can’t do this!
  • I’m never submitting to a CFP again, ever.

Stage three – Bargaining

T-6 weeks, I wonder what the impact would be on my sanity and brand might be if I email the conference and say something like:

I’m sorry I can no longer make the conference because <insert suitable excuse here that clearly isn’t even true>

Don’t do this. It’s okay to think it though!

Stage four – Depression

T-5 weeks, I can’t lie, it’s not right. I have backed myself into a corner and now I have to write this (stupid) talk.

Stage five – Acceptance

T-4 weeks, FINE I’ll write the talk! This is usually when I start writing the talk itself rather than just putting notes together. However, there’s more to acceptance than meets the eye. For me this step can be broken down into 30 separate steps (yes, 30)!

  1. Write content
  2. Decide content is crap
  3. Write different content
  4. Realise initial content wasn’t that crap
  5. Tweak content
  6. Decide whole talk is crap
  7. Briefly revisit stage three
  8. Force self to write more talk
  9. Decide whole talk is crap
  10. Give talk to brick wall
  11. Consider talk might not be crap
  12. Rework talk
  13. Decide whole talk is crap
  14. Give talk to friendly face
  15. Accept whole talk isn’t crap, mostly
  16. Incorporate feedback
  17. Realise talk doesn’t match the brief you submitted
  18. Decide brief was crap, revisit stage two
  19. Overhaul talk and make it pretty
  20. Give talk to more friendly faces
  21. Incorporate feedback
  22. Practice talk
  23. Practice talk
  24. Practice talk
  25. Practice talk
  26. Practice talk
  27. Practice talk
  28. Give talk
  29. Decide whole talk wasn’t crap
  30. Vow never to do this again, until the next time

It’s not just me, is it? Hope to see you there!

MongoDB

mongod, mongo, mongosh, mongos, what now?

As you might know, I joined MongoDB last month as a Keynote Storyteller, and, as you might expect, in order to work on the keynotes it’s important that I understand the world of MongoDB to the best of my ability.

As I progressed through my technical onboarding, I became aware that I was following some instructions without really understanding why. There is always a time and a place for this approach but this wasn’t it. In particular, I realised I didn’t exactly know when I would write these to my terminal:

  • mongod
  • mongo
  • mongosh
  • mongos

Yes, I know there are many more like mongodump, snigger, but I want to focus on these four first because they are the ones that I found myself using the most in my technical onboarding.

What is MongoDB?

This is as good a place to start as any. If I ask you what is MongoDB you’ll probably say “It’s a Database, Helen!” And you’d be right, but this is an excellent time for me to point out that it’s So Much More than just a database.

This is a good time to introduce MongoDB Atlas into the equation. MongoDB Atlas is a MongoDB database as a service and it has a ton of cool services that you can check out at your own pace with a free tier.

I’m starting here because the rest of this post makes references to MongoDB terminology. You will need a MongoDB cluster which itself is made up of multiple database servers of which one will be primary and the rest secondary (replicas). This means that if your primary server is unavailable/unreachable, your data can still be accessed. Your cluster also has clients that can connect to it and manipulate your data. Now, down to business.

mongod

No, mongod is not some kind of database deity. In fact, it’s usually pronounced mongo-dee and it’s the MongoDB daemon, also known as the server for MongoDB. If you don’t start your server you have no cluster and then, well, you got nothing. You run mongod to start your server.

The MongoDB server listens for connections from clients on port 27017, and stores data in the /data/db directory when you use mongod. However, you can start your MongoDB server with different parameters if required:

mongod -–port 12345 --dbpath /srv/mongodb/

That said, MongoDB Atlas runs mongod for you, so you don’t need to run the server yourself. It’s just useful to know from an architectural perspective at this stage especially as it might pop up in training.

The MongoDB daemon process that you start with mongod (or that MongoDB Atlas starts for you) manages your data access and any requests you might make such as add this, query that, or change that.

Documentation and helpful links:

mongo and mongosh

So what is mongo? It’s the shell, it’s the client, it’s a javascript interface that you can use to interact with the MongoDB server (mongod). For example:

mongo --host mongodb0.example.com:27017

However, as of June 2020, it was superseded by the new Mongo Shell, called, wait for it, mongosh! Bold for emphasis, it genuinely took me more than a few seconds to realise why it was called mongosh – you’re welcome. mongosh has improved syntax highlighting, command history and logging in case you were wondering! For example:

mongosh --host mongodb0.example.com:27017

When should you use mongo or mongosh? If you are able, you should run mongosh when you want to interact or change the data. Of course, if you prefer you can still use mongo but you won’t get the new features introduced in the newer MongoDB shell (mongosh). Don’t forget that the shell, whichever you use, is just a way to communicate with your database cluster.

Documentation and helpful links:

mongos

So that’s the daemon, or server, for MongoDB covered and two client options, that just leaves mongos for this blog post. This does not spin up multiple MongoDB clients, sadly. It’s just a proxy that sits between the client application (mongo/mongosh) and a sharded database cluster, that is multiple mongod replica sets.

It’s what your clients (mongo or mongosh) interact with when you run queries against sharded data. It does not replace your database server, it is in addition to. You need to point it at your replica sets, for example:

mongos --configdb cfg/127.0.0.1:27017

Now your first question should be why do I even need a proxy between my client and server just because my data is sharded? That is an excellent question! You need mongos to route the queries and any write operations to the shard(s) as required.

The mongos proxy is a map that your client can use to query or make changes in your cluster when your data is sharded. This in-between proxy is required because your cluster doesn’t know which shard(s) that data exists on, but the mongos proxy does. It also knows which shard to insert data into, if that’s your requirement.

Documentation and helpful links:

Putting it all together

This blog post has been a deliberately simplistic viewpoint to illustrate the components, however, I like to know what’s going on beneath various abstractions which is why I wrote it. That said, do remember that MongoDB Atlas manages this for you!

In summary, from the CLI, run mongod to start your MongoDB server for your cluster in a training environment. Note that in the real world (which again MongoDB Atlas manages for you), you would need to run at least three mongod instances. You should never run just one in a production environment. You can then use either the legacy mongo or the newer mongosh shell commands to interact with your cluster.

If your data is sharded you will need to additionally run at least one mongos process to ensure that your queries are routed to the right shard(s). Again I’m talking about a training environment here rather than a production environment!

I got one of the real MongoDB developer advocates (thanks Mark) to help me draw a diagram for you:

Diagram of the commands as architecture

Finally, for those of you wondering where you can get your hands on some MongoDB training, go check out MongoDB Basics and see where your learning journey takes you.

And that is mongod, mongo, mongosh, and mongos!