IntelliJ IDEA Made me Lazy

cat-2360863_640.jpg

I haven’t always been lazy; it’s a fairly recent addition to my repertoire of skills. And do you know who I blame? I blame IntelliJ IDEA. I used to check that I’d completed a statement correctly, I used to look at javadoc, I used to check I’d closed my parentheses correctly, but now I don’t give things a second glance.

Image by photosforyou from Pixabay

It’s all IntelliJ IDEA’s Fault

No, really, it is. Back when I was a (cough) younger adult, we had to type out all the code, we also thought it was cool to mix drinks that turned into something akin to gorilla snot. Maybe we weren’t that smart, but I am discovering one thing at a rapid rate, IntelliJ IDEA was smarter than me, even 20 years ago (I’d like to say it was a low bar).

I took a long break from coding, about 20 years, in fact. When I left coding, I wrote code in Vi and had memorised that very useful shortcut :wq. IDE’s were around, but in fledgeling forms. Recently I came back to coding, and I walked straight into IntelliJ IDEA’s open arms.

Exhitbit 1 – Statement Completion

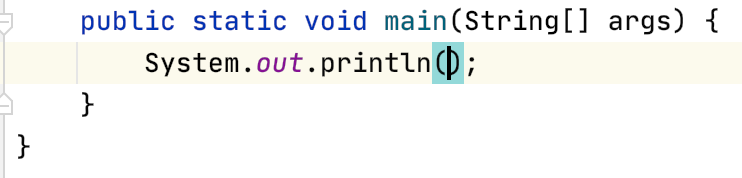
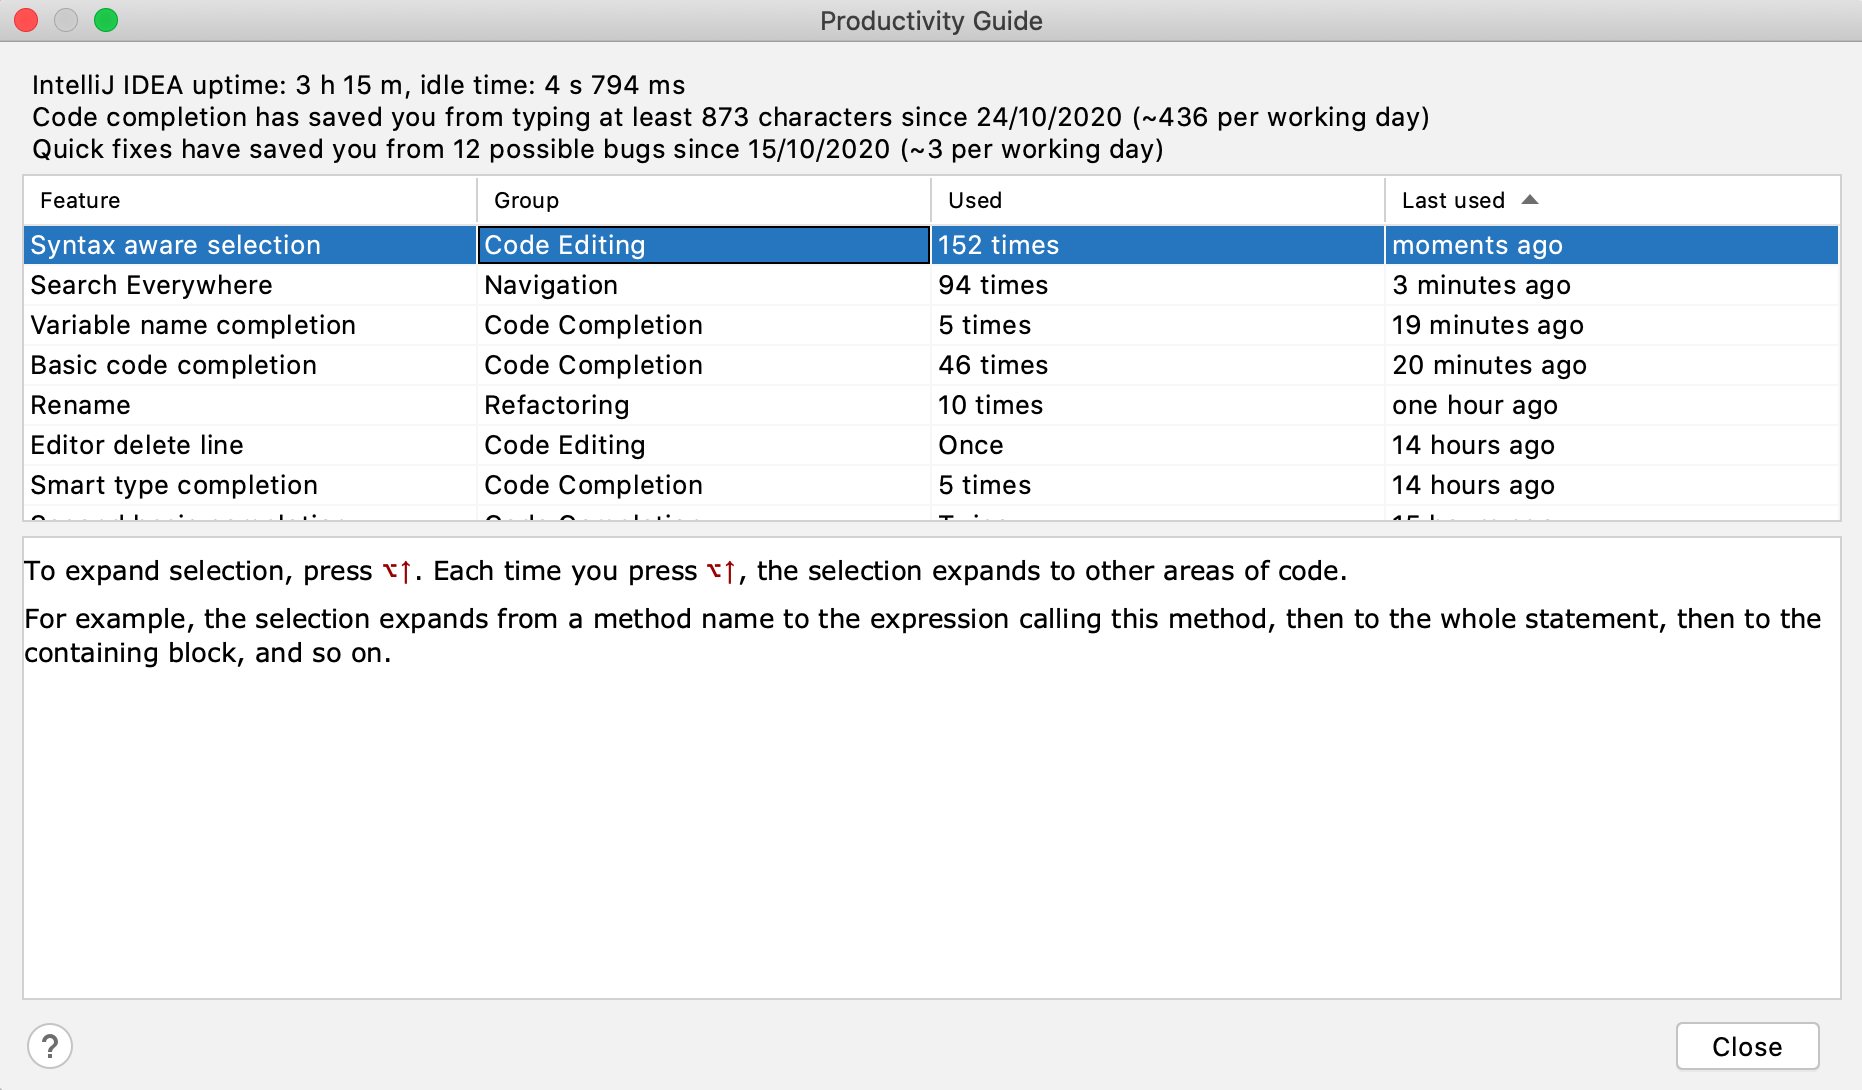
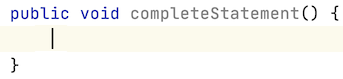
Never one to take responsibility for my own actions, I’d like to offer up exhibit one – Statement Completion in IntelliJ IDEA. When you use the combination of Cmd+Shift+Enter, on macOS or Ctrl+Shift+Enter on Windows/Linux, IntelliJ IDEA completes it for you so that it will compile. I don’t even know where the semi-colon button is on my keyboard anymore; I don’t need it. Allow me to demonstrate.

Try this one.

Rubbish right? Naturally, it won’t compile.

auto-complete-statement-post.png

Use Statement Complete and boom, we get this.

IntelliJ IDEA is kind and pops the caret in the right place as part of Statement Complete too. Sure, it’s only a few characters, but there’s a deep-seated comfort in knowing IntelliJ IDEA made it compile. It might not do what you want yet, but that’s your problem, mostly. I recommend you train your fingers to master this one, it will help you sleep at night.

statement-complete-presentation-mode.png

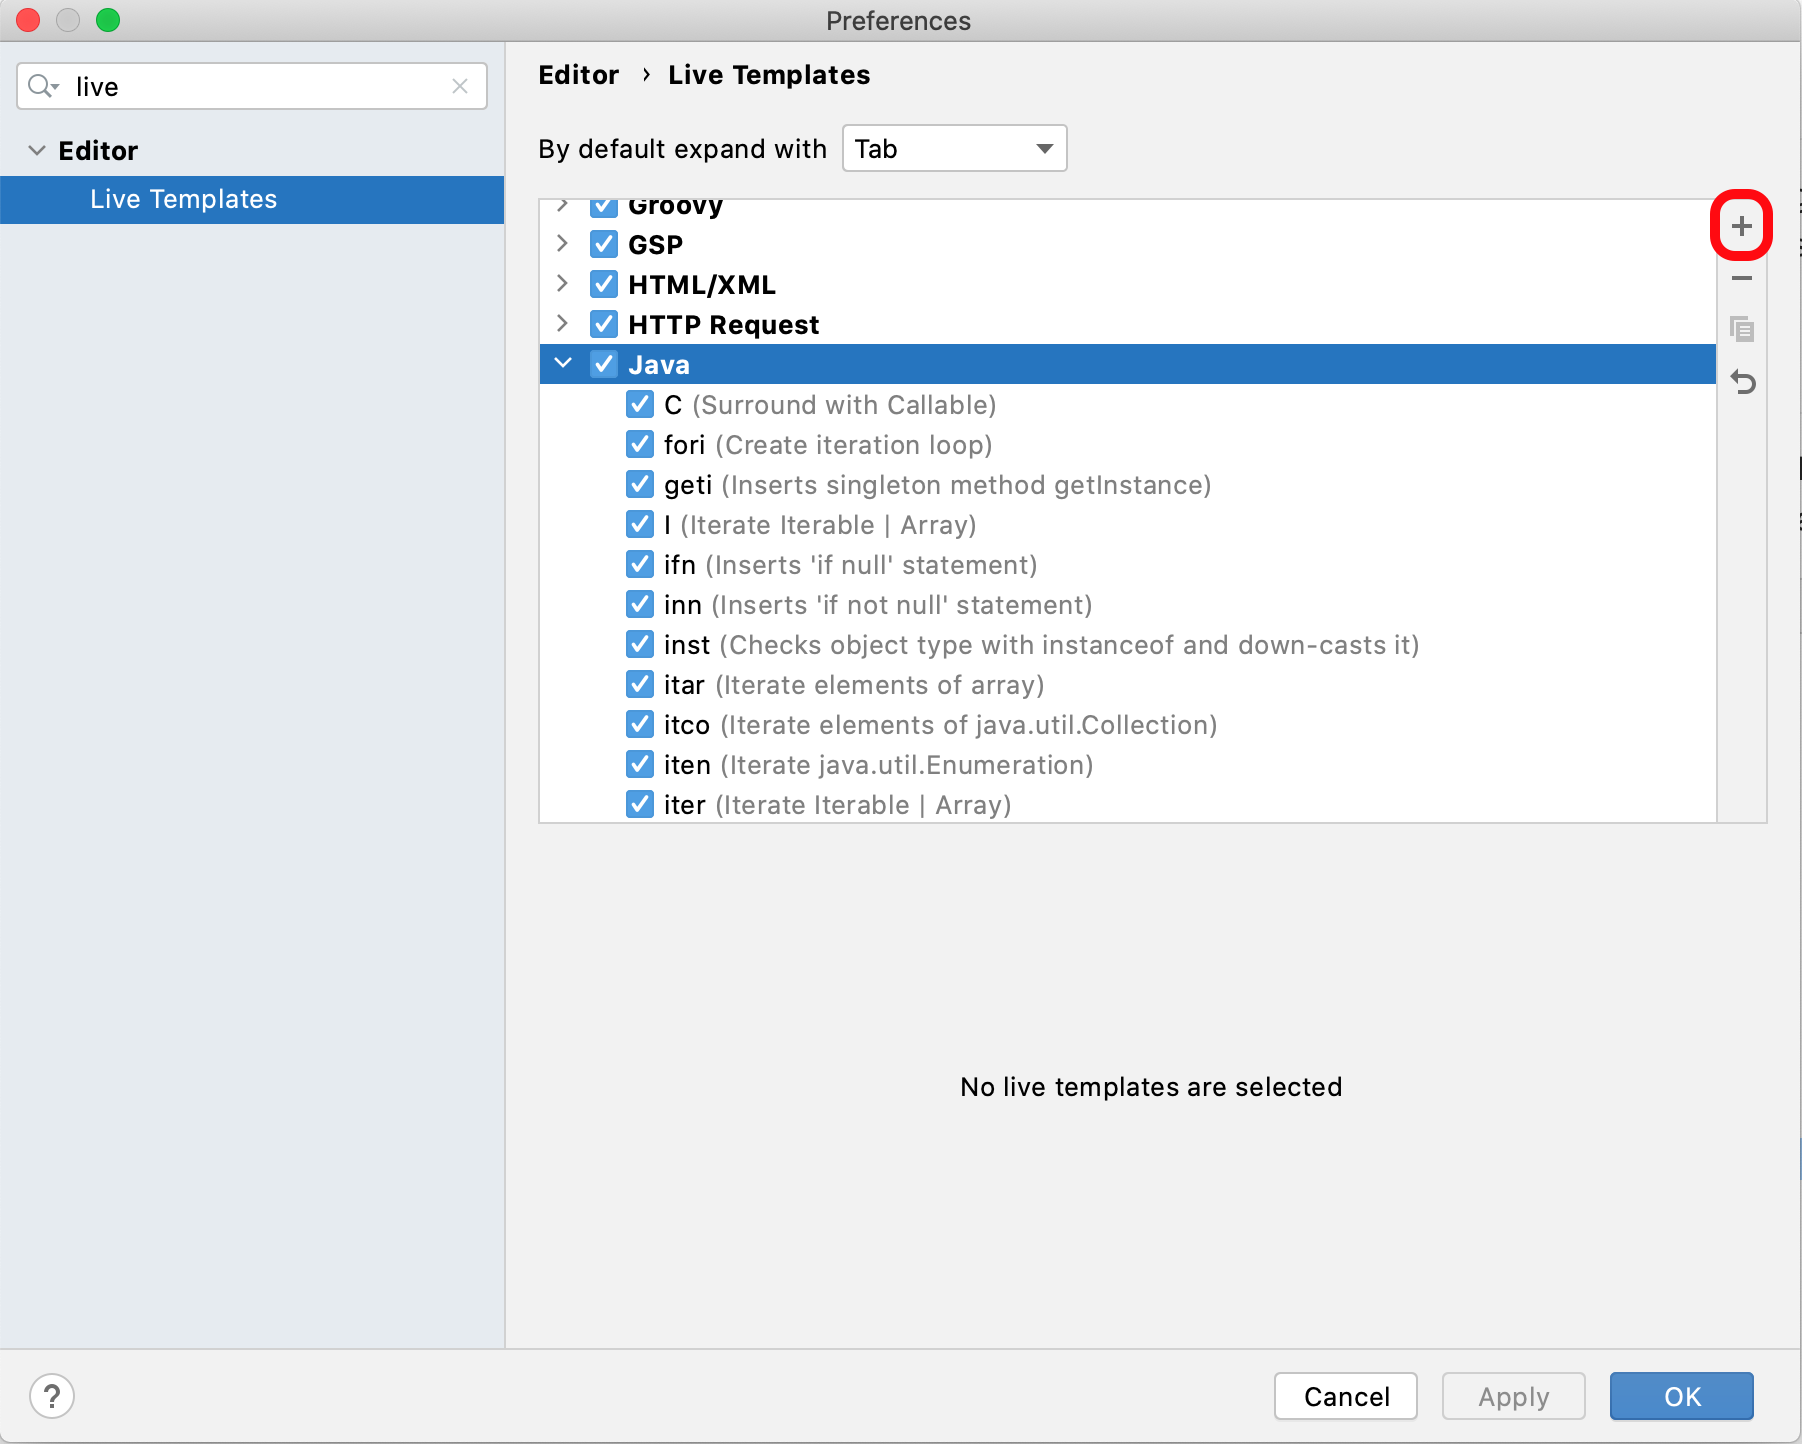
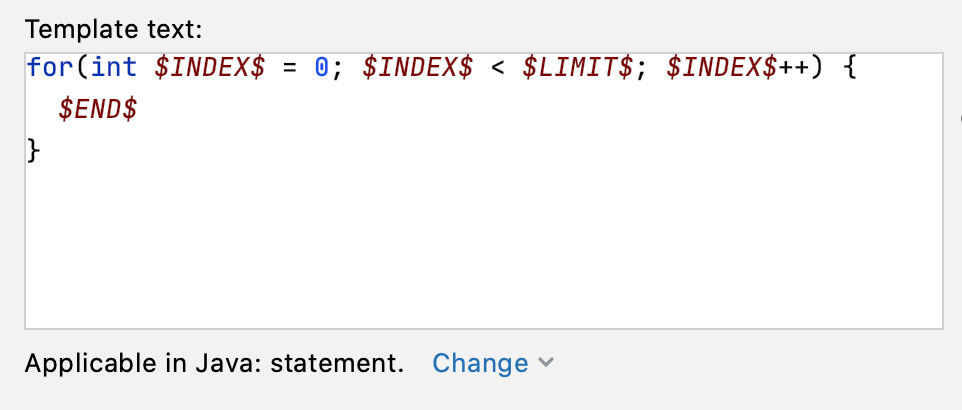
Exhibit 2 – Live Templates

I covered these in detail in this blog, but here’s a quick recap.

for-live-template-pre.png

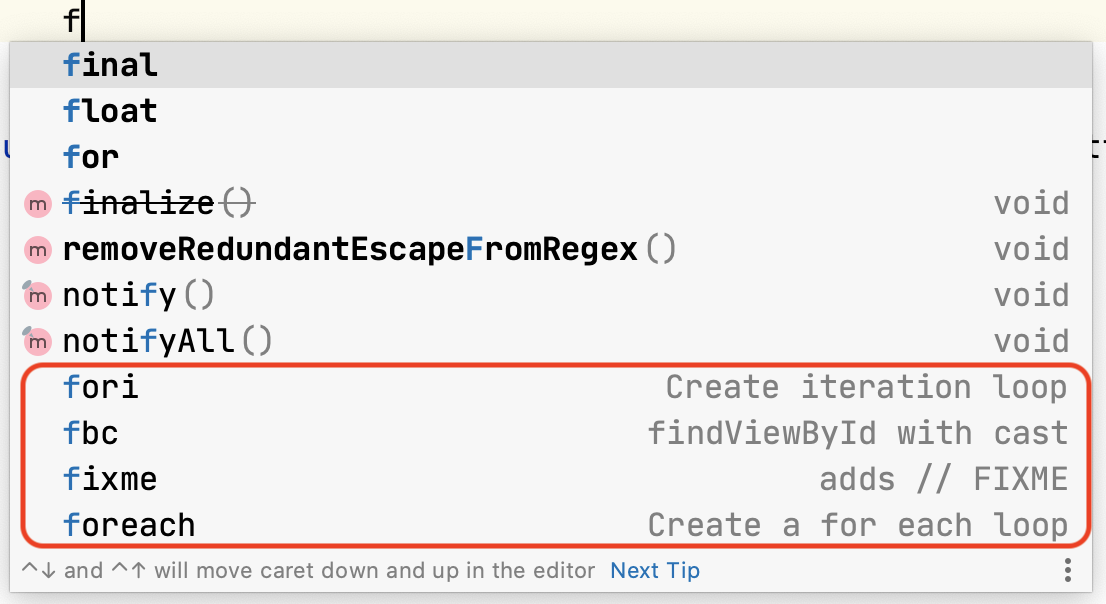
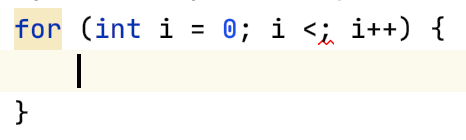
Remember the days when you had to type the whole `for i` loop out? Well, they’re as dead as the shell-suit fashion of the 1990s.

for-live-template-post.png

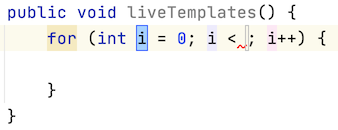
After we press return, the Live Template in IntelliJ IDEA does all the boring stuff for us.

Incidentally, you should press Tab to move to the next point that needs your input (the red squiggle).

A few more of my favourites are:

psfs will give you public static final String

And

soutv (in a fori loop will give you System.out.println("i = " + i);)

There's 35 more for you to check out with your beverage of choice! There's no keyboard shortcut for Live Templates; they'll just appear when you summon them by starting to type what you want.

Exhibit 3 – Post-Fix Completion

It seems like the humble dot is extremely powerful in IntelliJ IDEA. It does Basic Completion automatically, but, it also does something very cool in that it can be used to tell IntelliJ IDEA to wrap whatever you just typed in some more code.

We’re just mere humans, we obey the laws of the languages we speak and write (mostly), but thinking is hard. Allow me to demonstrate. We don’t think:

  1. I want to output some text to the console.

  2. I want to write some text.

No. We think:

  1. I want to write some text.
  2. Oh, also, I want to output that text to the console.

This is exactly what Post-Fix Completion does. It builds on live templates, where applicable, and helps your brain to flow in the order of things that it’s probably become accustomed to over the years (many in my case).

Before post-fix completion, the earlier example becomes:

  1. I want to Output some text to the console

    sout.-> System.out.println();

  1. And then I want to write the text to output

    "I wandered lonely as a cloud"

But, with post-fix completion:

  1. I want to write some text.

    "I wandered lonely as a cloud"

  1. Oh, also, I want to output that text to the console

    .sout -> System.out.println("I wandered lonely as a cloud");

There are 46 types of Post-Fix Completion in IntelliJ IDEA 2020.2. That’s a lot of time saved in your day and a lot of language-based syntactic-sugar for your thinking-brain. Other cool examples include:

assert to create an assertion based on a boolean expression, for example:
is2020OverYet.assert

Becomes

assert value;

My favourite code construct, the humble for (and fori loops):

String[] monthsLeftIn2020 = {"November", "December"}
monthsLeftIn2020.for

Becomes

String[] monthsLeftIn2020 = {"November", "December"};
for (String months : monthsLeftIn2020) {

}

Lastly, this one is pretty cool. I like var and this is one way that IntelliJ IDEA takes the notion of var to make your life just a little easier. You can use .var to ask IntelliJ IDEA to declare something that you’ve created as the correct explicit variable type. Let’s look at the String.var portion of this:

void speed2020Up(Magic magic) {
   magic instanceof String.var
}

Using .var asks IntelliJ IDEA to put the variable type in for us, it’s a boolean because that’s what instanceof returns.

void speed2020Up(Magic magic) {
   boolean b = magic instanceof String;
}

You will also have the option to use the var type for real at this point if you want to. Now, var is fabulous, but Java is still a statically typed language. If you, as a human-being (presumably), can’t figure out what type it is, please don’t use var as the variable type. Using .var is geat, but declaring something as type var is a big no-no if the type of the expression is not quickly decipherable. Gift your fellow humans (right now, we all need it) by stating the type that it evaluates to when all is said and done. They’ll thank you for it and you’ll help them sleep better at night.

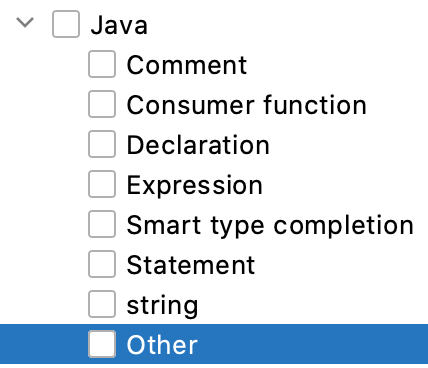
Exhibit 4 – Smart Completion

With IntelliJ IDEA you get Basic Completion out of the box, but Smart Completion is just an extra finger tap away by using Ctrl+Shift+Space. Smart Completion not only analyses what could be correct, but it takes it one step further and looks at the context of the surrounding code to make the right decision. If IntelliJ IDEA can determine the appropriate type for the right-hand side of an assignment statement, initiating a variable, a return statement, arguments of a method call and more, it will filter the list to just that. To show you the power of Smart Completion, I’ll show it to you alongside basic completion for comparison.

First up, we’ll invoke Basic Completion (no ‘dot’ so it won’t come up automatically in this case). Note that I have a space after new.

HashMap hashMap = new

basic-completion-hashmap.png

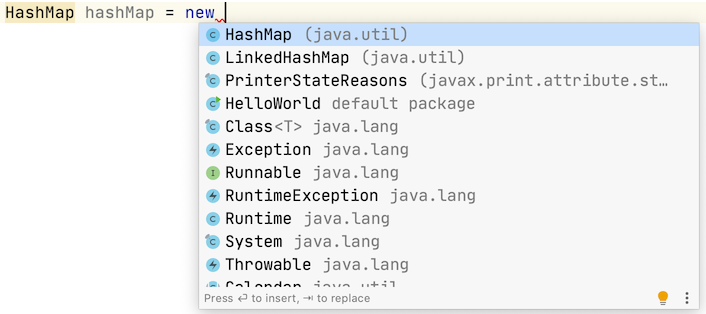
With basic completion we get a whole list of options, some valid, some not so much.

smart-completion-hashmap.png

But, with Smart Completion, we get a much shorter, more relevant list.

Okay, let’s look at a return statement next.

basic-completion-return-statement.png

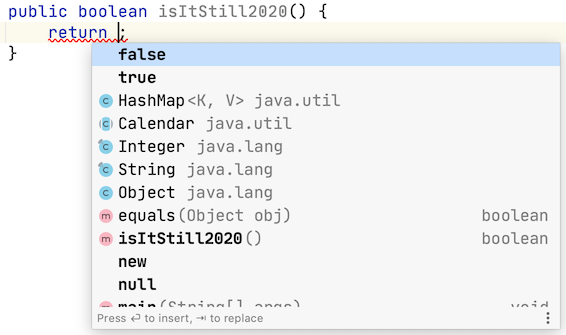
With basic completion.

smart-completion-return-statement.png

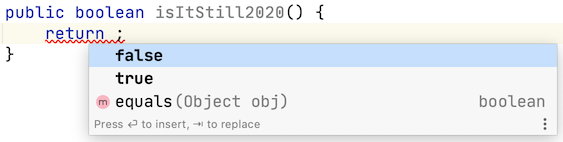
And with smart completion.

You get the idea, it's very useful! Here is the keyboard shortcut that you need:

smart-completion-shortcuts.png

Did Your IDE Make You Lazy Too?

There’s a lot of advantages to being lazy. It affords you more time for yourself, and your loved ones for a start. However, it’s more than that, being a developer isn’t all about writing code; there’s also:

  • Thinking / flow time
  • Working out what your code needs to do
  • Asking questions / Answering questions
  • Mentoring others / Being mentored yourself
  • So much more!

Being lazy isn’t a bad thing, it’s an efficiency gain that allows me to focus on the things that matter, which isn’t checking my parentheses are correct or remembering to put a semi-colon after my statement. No, it’s taking time for myself and those around me. Sure, it’s IntelliJ IDEA’s fault, but I am happy that we’re here!

My First Hacktoberfest (2020)

I took part in Hacktoberfest this year for the first time. I had a lot of upfront expectations and beliefs. One of these was bang on the money, the rest were so far from the mark it’s a little embarrassing.

What I thought at the start of Hacktoberfest

  • that the process would all be easy

  • that finding a repo to help with would be easy

  • that I would only take me a few hours

  • that I would learn stuff

Hacktoberfest Controversy

It never occurred to me that Hacktoberfest could be a force for bad. I appreciate that might sound naive, but when this blog post was published I was shocked. I read it over and over, trying to make sense of it. I mean, sure, it made sense, now it had been brought to my attention, but in my world, it wasn’t a thing. I simply hadn’t given it any thought. It was eye-opening.

I started questioning myself. I was excited to be participating in Hacktoberfest, but it really made me question if I was doing the right thing. That blog post triggered a change in the rules for Hacktoberfest from Digital Ocean. Repositories then became opt-in to Hacktoberfest which I fervently hope did address the problems highlighted in the earlier blog.

My Experience

So after a somewhat bumpy start and angst, I decided I would still participate in Hacktoberfest because I hoped I would not only add value, but I would also learn stuff. And I like learning stuff!

Job 1 – Find a Repository to Contribute to

Easy right? Nope, not even close. I tried two primary routes here, I browsed the repositories labelled hacktoberfest for hours at a time, there were hundreds. I would whittle them down to Java repositories, then documentation (where I was confident I could add value) and then either the bug would already be assigned to someone, or there would be comments indicating that someone wanted to pick it up. I moved on.

I wasn’t having much luck with this approach, so I considered meetups. This was vaguely successful, but it wasn’t enough. I was painfully out of my depth, and I knew it. I felt like the places I could add value were so small and, even if they existed, I couldn’t find them. I felt utterly defeated.

So we’re now into the second week of October, and all I’d achieved was to get stressed about whether I was doing the right thing participating and, even if I was doing the right thing, I couldn’t find a suitable repository and issue. It wasn’t going great.

Job 2 – Find a different way to achieve Job 1

I’ll be honest, I had a few G&Ts and wondered how on earth I was going to get myself out of my Pit of Doom™️. Then it occurred to me that I had a very obvious option to me that I had not explored. I needed to ask for help. I was incredibly fortunate in many ways in that I had made some contacts in the OSS world before Hacktoberfest 2020. I reached out to a connection and said that I was stuck and I was struggling.

And that’s when my fortune changed. They directed me to a repository where I could add value and a bug too that wasn’t assigned. It was a completely different experience. To be honest, I didn’t realise how little I knew, even then! I took their advice and read the readme. I proceeded to fork the repo, and then clone it into IntelliJ IDEA (obviously). Somehow (still couldn’t tell you how), I managed to run Docker despite knowing nothing about it, and I got the documentation bug fixed up and tested. Go me! I made a PR on the original repo to pull my changes in, and it got accepted. Mind Blown. I never thought I’d make it that far, but I did. I wouldn’t have achieved any of that without help.

I made a couple more PRs using the same repository and Hacktoberfest 2020 is now in the bag. But, I don’t feel as elated as I thought I would. I haven’t been able to put my finger on why, after all, Hacktoberfest has been incredible for my learning. I used it as an opportunity to learn more about the fork-ing, the cloning, the Docker-ing, the PR-ing, the rebasing-of-the-upstream-repo-ing. I probably made too many verbs there, sorry. That was all new to me, and I loved and am grateful for it. I’m annoyed that I waited until Hacktoberfest to do it mind you. I learned so much stuff and, best of all, I’m now a maintainer to that repository. What a fricking honour; I intend to continue to grow and contribute to it outside of the fence of Hacktoberfest.

Takeaways

I was asked on this session what I would tell my younger self next time around for Hacktoberfest. This is my answer (now I’m not under the pressure of a YouTube live stream!):

Do Nots

  • Do not wait until “Preptember” to get ready to contribute to Open Source Software. Do it all year round if you want to.

  • Do not wait until “Hacktober” to offer to contribute to Open Source Software. It was a catalyst for me, yes, absolutely, but I regret waiting.

  • Do not give it all up in “Postvember” (I’m struggling here). Give back. I intend to.

Dos

  • Do attend meetups throughout the year and get to know people. They will be your guiding light throughout the process.

  • Find people who are passionate about it, get to know them and ask them how you can help.

  • Do share your story and your experience. It might help others.

Live Templates in IntelliJ IDEA

Okay, I did the math. If you use all 38 of the Live Templates for Java that are available out of the box in IntelliJ IDEA 2020.2, you will save your finger pads approximately 2092 presses of wear and tear, and that’s just each one once, the reality is likely to be substantially higher. I will caveat this by saying that I counted the unresolved variables, yours may be longer or shorter. Still, it’s impressive!

What are Live Templates?

Java has had its fair share of grief over boilerplate code and verbosity. You could type it out manually (boring), switch to Kotlin (it’s an option), or take a look at using IntelliJ IDEA to save you both time and effort.

When I first came across the notion of Live Templates, I couldn’t figure out what was ‘live’ about them. Did they need feeding or something? It seems to be an industry-standard term, so I’m no longer devoting much energy to this quandary, but if you were wondering the same, you’re not alone.

There are lots of types of live templates in IntelliJ IDEA (38 in fact, as I mentioned). There’s the delightful four-finger taps `psvm` which will expand to 39 finger taps of:

public-static-void-main.png

And another of my favourites, also four-finger taps, is `sout` which expands to 20 finger taps:

system-out-println.png

The Live Templates even determine where the caret appears, which is why screenshots are useful here. There are lots of these ‘non-variable’ Live Templates. They’re quick to use and will quickly embed themselves in your muscle memory. You’ll wonder how you ever wrote:

public static final String

… instead of psfs

However, that’s not all live templates can do; they can also help you with something called ‘parameterised templates’ with variables that you can manipulate.

For example, fori gives you a rather lovely for loop template (29 finger taps):

for-loop-clean.png

By default, IntelliJ IDEA will put the caret on the first instance of i, and this is so you can change it to your preferred variable if required. If you then hit tab, the editor will jump you to the user input part between the less-than symbol and the semi-colon. Tab again will drop you into the body of the loop so you can step away from those arrow keys.

Other live templates for user input constructs include itar to iterate over elements of an array, itco to iterate over elements of a Collection as well as may other iteration operations. lazy is another win, quite literally, to perform a lazy initialisation.

Identifying a Live Template

IntelliJ IDEA is always trying to be helpful. One thing I struggled with was working out what was what when I was typing code. You can spot a live template from the lack of parenthesis and a helpful description. For example, the last four here are live templates, but only one is strictly from Java – fori.

live-template-list.png

Poking around Live Templates

You can take a look at Live Templates from your Preferences using ⌘, on macOS and Ctrl+Alt+S on Windows and Linux then start typing in Live Templates. You’ll see the list split by language. You can have a dig around in here until your heart’s content turning them off (and on again). I found it interesting to check out not only what Java Live Templates there were but also the Live Templates available in the other languages.

Making/Editing/Duplicating a Live Template

Manipulating Live Templates is easy to do in IntelliJ IDEA. As above, find your Live Templates in Preferences and then click this little plus icon:

If you want to duplicate one instead, use the icon a bit further down that looks like paste clipboard.

When you select 1. Live template you can then enter a keyboard abbreviation, a description, and the text that will form your live template.

Live Templates are very flexible in their creation, so here’s a couple of callouts. Firstly, know and use variables wisely. I found these a little bit confusing at first glance, but this documentation removes the mystery nicely and explains what each one does.

Let’s walk through the fori Live Template to see how it breaks down:

for-i-live-template.png

When we use it in a Java class we get this:

for-i-empty.png

How does that work then? Looking back at the Live Template definition, we can see the Edit Variables button. Clicking it yields this information:

edit-template-variables.png

This tells us that the variable $INDEX$ is defined as suggestIndexName() which we can see from the page I pointed you to earlier is defined as:

So $INDEX$ becomes i when we use the Live Template. $LIMIT$ didn’t get a definition in the Live Template so when it’s used in a Java class, that’s where the tab lands for the user to enter a value.

If you leave the value blank, the user can tab to it when the Live Template is used and enter their preferred value, as we saw in the fori example earlier.

Secondly, define your context carefully; this is where the Live Template will be available for use. For example, these are the available Java contexts:

java-contexts.png

Our fori example has a context of Statement which makes sense for a for loop:

for-i-context.png

Now you can go forth and create all the Live Templates that your heart desires and save even more finger taps!

How to Feel Good (about Live Templates)

It’s 2020, to be honest, we all need a little extra help with that warm fuzzy feeling this year. I found this thing called Productivity Guide in IntelliJ IDEA. It doesn’t just cover Live Templates; it covers everything that IntelliJ IDEA does to save your finger pads from wear and tear. Mine is pretty feeble because I have to reset my environment multiple times for various screencasts and stuff. I bet your IntelliJ IDEA statistics are substantially more impressive!

The Java SE Ecosystem

The Java SE ecosystem is strewn with acronyms that it has picked up over the last 25 years. Sometimes those acronyms even mean multiple things. Sometimes there are acronyms within acronyms! This post attempts to explain them all in terms of two main groupings:

  • OpenJDK

  • Java Development Kits (JDKs)

What is ‘OpenJDK’?

The phrase OpenJDK is used to describe at least three fundamental things in the Java ecosystem. I’ve expanded the links here so you can see what I’m talking about.

First

First, there is a place called OpenJDK which lives at https://openjdk.java.net and is also known to some as The OpenJDK Project. This is where people collaborate on an open-source implementation of the Java specifications, https://www.oracle.com/java/technologies/java-se-glance.html, which are released every 6 months. Sun Microsystems open-sourced the majority of Java in 2006 under the GNU General Public License (GNU GPL) version 2 with a linking exception. OpenJDK serves as a continuation of that change. This is the use that I will refer to througout this blog. When I say OpenJDK I mean the place at https://openjdk.java.net unless otherwise specified.

Second

OpenJDK can also refer to just the source code repository on GitHub available at https://github.com/openjdk. This is the reference implementation of the Java specifications that I mentioned above. Many vendors use the term OpenJDK for their specific JDK binary, which is produced by building a binary off the OpenJDK code on GitHub. For example AdoptOpenJDK, which is available at https://adoptopenjdk.net.

Third

Lastly, OpenJDK can also refer to Oracle’s free JDKs which live at https://jdk.java.net. These are version specific binaries built from the source code which is available on GitHub at https://github.com/openjdk. Oracle provides fixes to this JDK for 6 months (until the next release of Java).

Who contributes to OpenJDK?

There are various channels to contribute to OpenJDK. This blog from Oracle has a graphic which breaks down committers for Java 15 – those that committed code to OpenJDK. To contribute to OpenJDK, you need to use a JDK Enhancement Proposal (JEP) to start with.

Correction with thanks to Marc Maathuis: You don’t always need a JEP to contribute to the OracleJDK. Bug fixes, for example may not. Contributors need to have signed the Oracle Contributor Agreement.

What are JEPs?

JDK Enhancement Proposal (JEP) is a proposed change to OpenJDK. You can think of them as the roadmap for Java. Like all good roadmaps, there’s no commitment to inclusion or timescales. Some JEPs require changes to the Java specifications. In this instance, a corresponding Java Specification Request (JSR) is required.

What is a JSR?

A Java Specification Request (JSR) may detail potential specification changes (where present) that arise from one or more JEPs. Not all JEPs will have JSRs; if the JEP doesn’t have changes to the specifications, you don’t need a JSR. A JSR may also be a suggested new specification for Java SE that does not require a JEP, such as a new specification for an API for computer vision. JSRs are considered for inclusion in the Java specifications by the Java Community Process (JCP).

What is the JCP?

The Java Community Process (JCP) is a process to facilitate the review and ultimate inclusion of changes to the Java specifications.

What are JDKs?

Java Development Kits (JDKs) are implementations of the Java SE platform specification by different vendors and groups of people, such as the open source community. Some of them are built from the OpenJDK source code. JDKs include the Java Runtime Environment (JRE), as well as other tools that help you develop Java.

What is the Java Runtime Environment (JRE)?

The Java Runtime Environment (JRE) is a component of the JDK that is required to run Java. It used to be a separate download from the JDK, but, since Java 11, it’s now part of the JDK itself rather than a separate entity meaning you can no longer download it separately.

Are all JDKs the same?

Vendors may introduce little implementation differences such as garbage collection, branding, and utilities, but they are all implementations of the Java platform specifications. For the purpose of this blog I’ve assumed the Java SE platform.

When can you call something a JDK?

To be called a JDK officially, the binaries need to have passed a Java Compatibility Kit (JCK) for that release which is a collection of Technology Compatibility Kits (TCK) that tests each JSR to ensure that the implementation of the specification behaves as expected. Oracle’s OpenJDK we spoke about earlier has passed a JCK, for example.

What’s a Technology Compatibility Kit (TCK)?

A Technology Compatibility Kit (TCK) is a set of tests that is applicable for a JSR. There has been controversy on the license for the TCK given it’s an open source project. There is now a specific license to allow the TCK to be run against the OpenJDK source code under the GPL license.

Who makes JDKs?

There are lots of JDKs out there. They all vary in terms of license, support, branding, and implementation differences. The list includes, but is not limited to AdoptOpenJDK, OracleJDK, Oracle OpenJDK, RedHat, and IBM. It is also possible to build your own JDK too. Talking of blogs, this one from the Java Champions is excellent and helps fill in some of the gaps as to how we got here.

Summary

‘OpenJDK’ is either:

Java Development Kits:

  • A binary which is an implementation of the Java platform specification that has passed a TCK.

  • Some JDKs are free to use, some have a cost associated with them for various things such as commercial use, fixes and support.

Contributions to Java and updates:

  • Anyone can contribute to OpenJDK.

  • The JCP is used to manage updates to the Java specifications. Anyone can join the JCP.

  • JEPs are the process for including changes to OpenJDK.

  • JSRs are the standards for Java SE, which may, or may not be implemented in the JDK itself.

New to IntelliJ IDEA? Me Too.

Until recently, I last wrote Java in anger in 2002. IntelliJ IDEA had just been released; it wasn’t remotely on my radar. I honestly can’t remember what IDE we were using back then, but it certainly was a very long way to the fully featured IDE that JetBrains produce today. Here’s my experience of using IntelliJ IDEA for the first time.

Downloading IntelliJ IDEA

There’s a lot going on when you first load IntelliJ IDEA, but I learned pretty quickly that there are also some good first steps you can take to make your experience a little more comfortable. The first thing I would say is that it’s an enterprise tool so there is a learning curve. There’s no getting around that – it’s the same with any new piece of enterprise software; you do need to give it some time and be willing to go on a learning journey. Fortunately for us, JetBrains have, in my opinion, done a very good job at supporting developers on that learning curve. So, if you’re sitting comfortably, here are my recommendations.

  1. Figure out which version of IntelliJ IDEA you need. I once offended my now-colleague Trisha Gee by asking her which IDE to use because I didn’t know that IntelliJ IDEA Community was free. Foolishly, I assumed that because it was an insanely powerful IDE that it couldn’t possibly be free. I was appropriately schooled by a rather irritated Trisha and told in no uncertain terms that I could use IntelliJ IDEA for FREE. Honestly? Mind blown. I then decided that there must be a catch, so I assumed (see a pattern here?) that it would only be free for me to muck about and not free for commercial development. Wrong again, Helen, wrong again.

  2. Next up, download JetBrains Toolbox, even if you’re only using IntelliJ IDEA. I promise you it’s worth it. This cute little box will sit on your toolbar, chill out and manage all the installs and updates to IntelliJ IDEA with minimal input from yourself. Use your new JetBrains toolbox to download the version of IntelliJ IDEA you require and manage your licensing requirements.

Okay, great! You’ve got a shiny version of IntelliJ IDEA downloaded. Let’s get started!

Running IntelliJ IDEA for the First Time

  1. You’ll be asked to choose between Darcula and Light for your UI theme. I am not getting into this argument. I like light, deal with it. Click Next: Default Plugins to move on (unless you’re in a rush in which case click Skip Remaining and Set Defaults). IntelliJ IDEA does a great job of selecting the plugins that you’re most likely to need – these are the Default plugins. You can disable some of them if you want to but if you’re not entirely sure just leave them because you can tinker with them later.

  2. Click Next: Featured plugins, this is a list of plugins that are the most common ones. Feel free to go rummaging around for plugins, but keep it real – the more plugins IntelliJ IDEA has, the more it has to deal with as well as being your awesome IDE. I recommend you build the plugins up so you get used to IntelliJ IDEA out-of-the-box-almost to start with. With that in mind, you should definitely go ahead and grab Key Promoter X and IDE Features Trainer if you’re new to IntelliJ IDEA (which you probably are given you’re reading this)! Now click Start Using IntelliJ.

Little note here, if you screw up your settings and want to unwrap IntelliJ IDEA all over again, go to File > Manage IDE Settings > Restore Default Settings. This is relatively new and can be a very useful learning experience. 

Starting a New Project in IntelliJ IDEA

  1. I’m going to go ahead and start a new project. Here’s where we need to sort our Java version out. IntelliJ IDEA is pretty smart about this. It will go and look for the Java versions you’ve already got installed, if there are any. If it finds them, it will populate the Project SDK with them. If it doesn’t find any it gives you an option to download them. You can select your Vendor and your Version and click Download. I recommend you leave the default Location because again, IntelliJ IDEA is smart and knows exactly where to look to find what it needs.

  2. You can select additional libraries here if you want to and you know what you want. I am going to leave them blank and click Next.

  3. Next up, we have Templates. You can create templates from existing projects to recreate later, however on new installations the only template available will be Command Line App. This is a boilerplate Java application with a class and a method. If you’re new to IntelliJ IDEA, it’s worth selecting this option just to get a feel for the file structure and inner workings.

  4. Go ahead and enter a Project name. The Project location will be constructed from the name although you can change it if required. If you want to change the Base package you can do but for now, I recommend you go ahead and click Finish.

And there you have it! One shiny new IntelliJ IDEA project!

A Note on the ‘Release Version’

If you’re anything like me, the first thing you do is throw caution to the wind and go change a bunch of settings in the IDE because you ‘know what you’re doing’. Well, turns out, I didn’t! So, word of warning – if you see this error, it means your ‘Project bytecode version’ is set to something higher than your ‘Project SDK’ (and thus Project language level)’:

Java release version not supported

Check your SDK setting by using ⌘; on macOS, or Ctrl+Alt+Shift+S on Windows/Linux and looking at your Project Settings > Project, specifically your Project SDK and Project Language Level values and make a note of them.

Project Structure

Next, check your Project Bytecode version by using ⌘, on macOS or Ctrl+Alt+S and search for Build, Execution, Deployment > Compiler > Java Compiler. Your Project bytecode setting needs to either be the same as your Project language level, or something lower than it, such as Java 11. Then you can rebuild the project.

Java Compiler Setting

Being new to IntelliJ IDEA, something else that I wondered was what’s the difference between the Project SDK and the Project language level. As it turns out, the Project SDK are the tools you need to develop Java (seems fair), whereas the Project Language Level refers to the assistance that IntelliJ IDEA will give you in the editor. The two settings can be different as well. Your Project language level will restrict what inspections IntelliJ IDEA applies to your code and determine which compiler is used to turn your Java code into bytecode. You can override the compiler settings as I showed above if you don’t want to compile your code with the Project Language Level.

Summary

I can remember hating getting my environment set up at university – and I screwed it up regularly too. There is absolutely no doubt that IntelliJ IDEA makes the whole process of running ‘HelloWorld.java’ a whole lot easier. It does a great job of obfuscating the settings until you need them and will hold your hand throughout the process of setting up your environment without you breaking into a sweat about your classpath setting. Yes, you can break it, but you can also fix it very easily.

The discussion of whether to use an IDE, or not, is one that polarises people. As someone returning to Java after a long period of absence, working with an IDE of this calibre is like having a really knowledgeable friend help you achieve your goal (to run HelloWorld.java) and just that, as quickly and as efficiently possible. I know I’m still scratching the surface of what IntelliJ IDEA can do, but I’m a huge fan of the right information at the right time (which is when I need it) and IntelliJ IDEA does this very well. I’m looking forward to finding out more!

Java, Where Are We Now?

Before the last month I hadn’t written any Java in anger in 20 years. My professional path took me into the world of communicating and away from programming. Now it’s converged again as I embark on my developer advocacy journey. One of the things that I’ve already learned is that the Java world has changed, a lot. This blog gives you a whirlwind tour of the last 20 years, specifically with ownership and versions.

When I skipped town, Java was owned by Sun Microsystems and incrementing versioning in a fairly standard way. They started with 1.0 JDK in 1996, then 1.1 JDK in 1997, it became J2SE at version 1.2 in 1998, moving to 1.3 in 2000, and then 1.4 in 2002. You get the idea. Imagine my surprise when they jumped to Java SE 5.0 in 2004. 

Now there’s one really important point here that I know if I don’t mention it I will officially be “wrong on the internet”. There is a difference between what Sun called Java to the masses and what it really was underneath. For that reason I’ve distinguished between the marketing name and the version that would have been returned had you asked Java what version it was in the following diagrams. The text uses the marketing name for ease of reading.

Another two years went by, and we ushered in Java SE 6 in 2006 – this release didn’t have a minor version either, just 6, outwardly at least. There was then a strange lull until 2011 (that’s 5 years!) before we said hello to Java SE 7. This gap is at least partly explained by Oracle Corporation buying over from Sun Microsystems on the Java front. Java has had its fair share of criticism when it comes to the speed of its growth, I presume in part due to this lull.

However in 2011 Java 7 landed and the world moved on again. I got married in that lull and learned that real adulting largely involved early nights and paying bills. Apparently you can’t get by on 4 hours sleep and a large quantity of wine.

The unstable cadence of releases continued for a bit with Oracle at the helm, but 2014 brought us a huge release in the form of Java 8. Oracle also labelled this a Long Term Support (LTS) release, which means that there are some licensing implementations for the OracleJDK which I’ll cover in a future post. 

Another couple of years went by, I found out that I liked lifting weights, and in September 2017 we saw Java SE 9 with Java SE 10 hot on its heels in March 2018. Wait a minute! Did you just say 6 months between a release? Yes, yes I did.

And that’s why, in 20 years we were now almost on Java SE 15; Oracle’s model of releasing is every 6 months. It doesn’t matter what is in there, they will categorically release Java every six months and they will increment the whole version number when they do so. Whatever functionality is finished goes in. I will cover exactly how functionality gets into Java in a future post.

At time of posting we’re rapidly marching towards the September 2020 release of Java SE 15! Java has changed, a lot. It has grown, it has matured and it’s stronger than ever. That makes two of us!

Duke

Duke

How do you get into Technical Writing?

Or Technical Authoring, whatever 😉

I realised the other day that despite nearly twenty years in various roles in technical writing, and more recently product, I’ve never written a blog or shared some of the experiences. I’m now going to attempt to rectify this behaviour!

So let’s start back at the beginning with the age-old question — how do you get into technical writing? Well, you fall into it usually! No, I don’t mean it’s a massive hole, although some days that metaphor is apt, nor do you fill in one of those questionnaires at school and it spits out “hey, you’re gonna be a kick-ass technical writer one day”! Nope, sorry, that’s not true either, it’s never on those forms (for reasons I’m not entirely clear on).

So if not that, then how?

Well, sometimes a well-meaning friend pushes you into it with sage words such as “I think you’d be good at this” or “you kinda suck at your job, you need to try something else” (both of these happened to me).

However, an increasingly common route seems to be somewhat more sneaky and subliminal (but you can make it active if you know it’s what you want!). Imagine that you’re in a role, it’s your dream job, it’s what you’ve studied for, and it’s why you have a student debt that is at least 25% of your prospective future mortgage. One morning, while you’re munching your unbranded flakes of corn, you have the sharp realisation that some unseen force has been at work and you’re now the person that is trusted to not only review product documentation, but also create it because you enjoy it. You do your day job too, (you know, the dream one), but you’re also rather invested in the product documentation.

Wait, what?! I don’t even know how that happened! You carefully place your spoon back into your unbranded flakes of corn and wonder how you got here, what turns you took and why you find documentation, heck, technical documentation at that quite so alluring.

This is a great way to get into technical writing! Position yourself as the go-to person for the product documentation and demonstrate your awesome skills with each and every piece of valuable product documentation you create! Go ahead and create a business case for your dream job, mk II, (if it doesn’t exist yet) and land that technical writing job that maybe you didn’t even know was a thing, let alone your thing.

Are you broken? Nope! But you are a special and unique kind of person that is incredibly passionate about helping the user to achieve their goals when you know deep down that if they’re reading your prose, they’re likely already annoyed and have been failed by the product. Yet you still care, you still want to help champion them, you still see the beauty in the written word, and you want to wield it to solve the user’s challenge and help serve the product.

Good for you!